PostgreSQL のビルドメモ
はじめに
どうも、最近は MySQL と格闘するより k8s と格闘してるけんつです。そろそろ MySQL とも仲を深めたいところですね。
さぁそんなこんなで今日はなんとびっくりポスグレ話です。なんでこんなことになってるかって、最近は仕事で MySQL Operator を色々やってると他の DBMS Operator がどうなっているかということが気になり、有名なのといえば cloudnative-pg では?ということでまず PostgreSQL をやってみるかという話になったわけです。
準備
何はともあれまずはソースコードを持ってくる。まずはこれであれある。
$ git clone git@github.com:postgres/postgres.git
次はビルドに必要な手順のドキュメントを探す。これである。
www.postgresql.org
ビルド祭り
事前確認
ドキュメントを順に見ていくとまず make 3.81 以降が要求されるとのことで確認する。
$ make --version
GNU Make 4.3
Built for x86_64-pc-linux-gnu
Copyright (C) 1988-2020 Free Software Foundation, Inc.
License GPLv3+: GNU GPL version 3 or later <http://gnu.org/licenses/gpl.html>
This is free software: you are free to change and redistribute it.
There is NO WARRANTY, to the extent permitted by law.
次は色々あるが bison 2.3 以上を要求される。
$ apt list | grep bison

WARNING: apt does not have a stable CLI interface. Use with caution in scripts.

bison++/noble 1.21.11-5 amd64
bison-doc/noble,noble 1:3.8.2+repack-1 all
bison/noble,now 2:3.8.2+dfsg-1build2 amd64 [installed]
これ以上は ./configure がいい感じにしてくれるらしい。ちなみにその時のログは config.log に出る。
ビルドである
必要なパッケージ群がよくわからなかったのでとりあえず configure を実行してみる。cmake でないのが新鮮だ。
$ mkdir build && cd $_
build$ ../configure
icu 系が足りないと言われているので入れる。
checking for icu-uc icu-i18n... no
configure: error: Package requirements (icu-uc icu-i18n) were not met:

Package 'icu-uc', required by 'virtual:world', not found
Package 'icu-i18n', required by 'virtual:world', not found

Consider adjusting the PKG_CONFIG_PATH environment variable if you
installed software in a non-standard prefix.

Alternatively, you may set the environment variables ICU_CFLAGS
and ICU_LIBS to avoid the need to call pkg-config.
See the pkg-config man page for more details.
$ sudo apt install libicu74 libicu-dev
次は flex がないと怒られたので入れる。
$ sudo apt install flex
次は readline がないと言われたので入れる。
$ sudo apt install libreadline8t64 libreadline-dev
通ったのでオッケーである。
$ ../configure
...
configure: creating ./config.status
config.status: creating GNUmakefile
config.status: creating src/Makefile.global
config.status: creating src/include/pg_config.h
config.status: creating src/interfaces/ecpg/include/ecpg_config.h
config.status: linking ../src/backend/port/posix_sema.c to src/backend/port/pg_sema.c
config.status: linking ../src/backend/port/sysv_shmem.c to src/backend/port/pg_shmem.c
config.status: linking ../src/include/port/linux.h to src/include/pg_config_os.h
config.status: linking ../src/makefiles/Makefile.linux to src/Makefile.port
しかしここで、 debug ビルドしていないことに気がついたので debug ビルドを設定して make する
build$ ../configure --enable-debug --enable-cassert
build$ make -j$(proc)
するとこういったディレクトリ構成になっていることがわかる。
build$ ll
total 352
drwxrwxr-x  6 lrf141 lrf141   4096 Jan 18 22:32 ./
drwxrwxr-x  9 lrf141 lrf141   4096 Jan 18 22:32 ../
-rw-rw-r--  1 lrf141 lrf141   4176 Jan 18 22:32 GNUmakefile
lrwxrwxrwx  1 lrf141 lrf141     48 Jan 18 22:32 Makefile -> /home/lrf141/postgresqlProject/postgres/Makefile
drwxrwxr-x  2 lrf141 lrf141   4096 Jan 18 22:32 config/
-rw-rw-r--  1 lrf141 lrf141 284291 Jan 18 22:32 config.log
-rwxrwxr-x  1 lrf141 lrf141  39264 Jan 18 22:32 config.status*
drwxrwxr-x 61 lrf141 lrf141   4096 Jan 18 22:32 contrib/
drwxrwxr-x  3 lrf141 lrf141   4096 Jan 18 22:32 doc/
drwxrwxr-x 16 lrf141 lrf141   4096 Jan 18 22:32 src/
MySQLer としてはここから make install するような手順を走らせたくないので色々調べると、src/bin ディレクトリ以下に生成されたバイナリが固まっていて PostgreSQL 本体(?) は src/backend 下にあるらしい。
というわけで初期化を試す。
$ mkdir pgdata
$ ./src/bin/initdb/initdb -D pgdata
./src/bin/initdb/initdb: error while loading shared libraries: libpq.so.5: cannot open shared object file: No such file or directory
すると見事にライブラリを見つけられていないのでどうにかする必要がある。
まず見つからないと言われているライブラリはここにある。
$ ll src/interfaces/libpq
total 4052
drwxrwxr-x 5 lrf141 lrf141    4096 Jan 18 22:41 ./
drwxrwxr-x 5 lrf141 lrf141    4096 Jan 18 22:39 ../
lrwxrwxrwx 1 lrf141 lrf141      69 Jan 18 22:39 Makefile -> /home/lrf141/postgresqlProject/postgres/src/interfaces/libpq/Makefile
-rw-rw-r-- 1 lrf141 lrf141    3346 Jan 18 22:41 exports.list
-rw-rw-r-- 1 lrf141 lrf141   85952 Jan 18 22:41 fe-auth-oauth.o
-rw-rw-r-- 1 lrf141 lrf141   85952 Jan 18 22:41 fe-auth-oauth_shlib.o
-rw-rw-r-- 1 lrf141 lrf141   72256 Jan 18 22:41 fe-auth-scram.o
-rw-rw-r-- 1 lrf141 lrf141   76288 Jan 18 22:41 fe-auth.o
-rw-rw-r-- 1 lrf141 lrf141   62864 Jan 18 22:41 fe-cancel.o
-rw-rw-r-- 1 lrf141 lrf141  292168 Jan 18 22:41 fe-connect.o
-rw-rw-r-- 1 lrf141 lrf141  219376 Jan 18 22:41 fe-exec.o
-rw-rw-r-- 1 lrf141 lrf141   74968 Jan 18 22:41 fe-lobj.o
-rw-rw-r-- 1 lrf141 lrf141   76744 Jan 18 22:41 fe-misc.o
-rw-rw-r-- 1 lrf141 lrf141   65424 Jan 18 22:41 fe-print.o
-rw-rw-r-- 1 lrf141 lrf141  140136 Jan 18 22:41 fe-protocol3.o
-rw-rw-r-- 1 lrf141 lrf141   48856 Jan 18 22:41 fe-secure.o
-rw-rw-r-- 1 lrf141 lrf141  135288 Jan 18 22:41 fe-trace.o
-rw-rw-r-- 1 lrf141 lrf141    8920 Jan 18 22:41 legacy-pqsignal.o
-rw-rw-r-- 1 lrf141 lrf141   35080 Jan 18 22:41 libpq-events.o
-rw-rw-r-- 1 lrf141 lrf141       0 Jan 18 22:41 libpq-refs-stamp
-rw-rw-r-- 1 lrf141 lrf141 1419720 Jan 18 22:41 libpq.a
-rw-rw-r-- 1 lrf141 lrf141     318 Jan 18 22:41 libpq.pc
lrwxrwxrwx 1 lrf141 lrf141      13 Jan 18 22:41 libpq.so -> libpq.so.5.19*
lrwxrwxrwx 1 lrf141 lrf141      13 Jan 18 22:41 libpq.so.5 -> libpq.so.5.19*
-rwxrwxr-x 1 lrf141 lrf141 1166304 Jan 18 22:41 libpq.so.5.19*
drwxrwxr-x 2 lrf141 lrf141    4096 Jan 18 22:39 po/
-rw-rw-r-- 1 lrf141 lrf141   18912 Jan 18 22:41 pqexpbuffer.o
drwxrwxr-x 2 lrf141 lrf141    4096 Jan 18 22:39 t/
drwxrwxr-x 2 lrf141 lrf141    4096 Jan 18 22:39 test/
ここでしばらく詰まったのだが、所見ですべてを理解するのは面倒だったので --prefix で build ディレクトリを指定し make install する手段に出る。
build$ ../configure --enable-debug --enable-cassert --prefix=$(pwd)
build$ make -j$(nproc)
build$ make install
ここまで出たら起動しようと思ったが初期化が必要だそう。
$ mkdir pgdata
build$ ./bin/postgres -D pgdata
postgres: could not access the server configuration file "/home/lrf141/postgresqlProject/postgres/build/pgdata/postgresql.conf": No such file or directory
build$ ./bin/initdb -D pgdata
The files belonging to this database system will be owned by user "lrf141".
This user must also own the server process.

The database cluster will be initialized with locale "C".
The default database encoding has accordingly been set to "SQL_ASCII".
The default text search configuration will be set to "english".

Data page checksums are enabled.

fixing permissions on existing directory pgdata ... ok
creating subdirectories ... ok
selecting dynamic shared memory implementation ... posix
selecting default "max_connections" ... 100
selecting default "shared_buffers" ... 128MB
selecting default time zone ... Asia/Tokyo
creating configuration files ... ok
running bootstrap script ... ok
performing post-bootstrap initialization ... ok
syncing data to disk ... ok

initdb: warning: enabling "trust" authentication for local connections
initdb: hint: You can change this by editing pg_hba.conf or using the option -A, or --auth-local and --auth-host, the next time you run initdb.

Success. You can now start the database server using:

    bin/pg_ctl -D pgdata -l logfile start
どうやらいけたようだ
build$ ./bin/pg_ctl -D pgdata -l logfile start
waiting for server to start.... done
server started
build$ ps aux | grep postgres
lrf141   1199798  0.0  0.0 207120 24664 ?        Ss   23:14   0:00 /home/lrf141/postgresqlProject/postgres/build/bin/postgres -D pgdata
lrf141   1199799  0.0  0.0 207252  5696 ?        Ss   23:14   0:00 postgres: io worker 0
lrf141   1199800  0.0  0.0 207252  4124 ?        Ss   23:14   0:00 postgres: io worker 1
lrf141   1199801  0.0  0.0 207120  3660 ?        Ss   23:14   0:00 postgres: io worker 2
lrf141   1199802  0.0  0.0 207252  3700 ?        Ss   23:14   0:00 postgres: checkpointer
lrf141   1199803  0.0  0.0 207280  4700 ?        Ss   23:14   0:00 postgres: background writer
lrf141   1199805  0.0  0.0 207252  8092 ?        Ss   23:14   0:00 postgres: walwriter
lrf141   1199806  0.0  0.0 208708  6964 ?        Ss   23:14   0:00 postgres: autovacuum launcher
lrf141   1199807  0.0  0.0 208572  6188 ?        Ss   23:14   0:00 postgres: logical replication launcher
lrf141   1210033  0.0  0.0   3528  1888 pts/0    S+   23:15   0:00 grep --color=auto postgres
というわけでログインしてみる。
build$ ./bin/psql postgres
psql (19devel)
Type "help" for help.


postgres=# select version();
                                                 version
----------------------------------------------------------------------------------------------------------
 PostgreSQL 19devel on x86_64-pc-linux-gnu, compiled by gcc (Ubuntu 13.3.0-6ubuntu2~24.04) 13.3.0, 64-bit
(1 row)
勝利。
最終的な手順まとめ
MySQL を日常的にビルド・デバッグしているため完全ではないが少なくとも自分の環境では
$ sudo apt install libicu74 libicu-dev flex libreadline8t64 libreadline-dev
$ mkdir build && cd $_
$ ../configure --enable-debug --enable-cassert --prefix=$(nproc)
$ make -j$(nproc)
$ make install
$ mkdir pgdata
$ ./bin/initdb -D pgdata
$ ./bin/pg_ctl -D pgdata -l logfile start
$ ./bin/psql postgres
でいけた。テストを走らせたい場合は make check を make 以降で実施すると良いらしい。
おわりに
MySQL 風に make install なしで PostgreSQL を build ディレクトリ内で完結させて動かしたかったがいい方法を思いつかなかった。
まぁこれはおいおいということで。むしろ誰かいい方法があったら教えてほしい。地味に make install が長い。
ところでこの記事を書いて思ったが、いつになったら cloudnative-pg にたどり着けるのだろうか…。
追記 2026/01/20
元気に色々やろうとしたら愛用している IDE の CLion が autotools ベースの PostgreSQL ビルドにおいてコード解析を走らせられないということがわかったので meson 版をまとめておく。
ドキュメントは最初に参照したやつで問題ない。
$ mkdir build-meson && cd $_
$ meson setup .. --buildtype=debug -Dcassert=true --prefix=$(pwd)
$ ninja
$ ninja install
mysql-test-run で諸々の分析ツールを走らせる
はじめに
どうも、最近みんな AI がどうのという話をするようになっていかつい技術話が少なくなってきたことが悲しいけんつです。今日は MySQL ユーザが知っても 1mm ぐらいしか役に立たないであろう、mysql-test-run で valgrind と Gperftools Heap Profiler を使う方法について。
特に何かを語るわけではなく、自分がよく方法を忘れるのでそのメモだと思って雑に見てもらえれば、いっそ見てもらえなくても構わないぐらいの勢いで。
前提
MySQL は 8.4.7 を使う。
mysql-test-run、通称 mtr については解説が面倒なので以下のページに丸投げする。 Source Code Documentation のバージョンが 9.4.0 になっているが大差ないので気にしなくて良い。8.4 版を探すのが面倒だった。
dev.mysql.com
Gperftools Heap Profiler を使うということで、tcmalloc を使う。その辺が入っていない状態でビルドしようとすると怒られるが最近の MySQL ビルドは cmake 時点でのエラーメッセージがかなり丁寧なので、足りないものがあったら入れて再実行で良い。
ドキュメントはこれ。
gperftools.github.io
ビルドする
今回はいつもと違ってビルドから真面目に考える必要がある。結論からいくと以下のオプションを渡す。これが同時にやる場合の最小構成と思われる。
$ mkdir build && cd $_
build/$ cmake ../ -DCMAKE_BUILD_TYPE=Debug -DWITH_VALGRIND=1 -DWITH_TCMALLOC=BUNDLED
- CMAKE_BUILD_TYPE=Debug: これはいつもの debug ビルド
- WITH_VALGRIND=1: これがないと mtr どころか手動で valgrind を使うこともできないはず
- WITH_TCMALLOC=BUNDLED: ソースコードに同梱される*1 tcmalloc を利用する
あとはいつも通り make する。make が完了したら一応 tcmalloc があることの確認。
build$ ldd ./runtime_output_directory/mysqld | grep tcmalloc
	libtcmalloc_debug.so.4 => /lib/x86_64-linux-gnu/libtcmalloc_debug.so.4 (0x00007434a3200000)
テストケースを用意する
今回はあくまで手順の話なので、シンプルなテストケースを用意する。色々ツール走らせたりするのででかいテストケースを実行すると時間がかかって辛い。
mysql-test/suite/innodb/t/sample.test あたりに生やす。
CREATE TABLE t1(a INT NOT NULL) Engine=InnoDB;
INSERT INTO t1(a) VALUES(1), (2), (3);
COMMIT;
SELECT * FROM t1;
DROP TABLE t1;
このテストの result ファイルを作りたいので一度 record オプションをつけて普通に mtr を実行する。
build$ ./mysql-test/mtr innodb.sample --record
この実行が終わると result ファイルができているはず。
CREATE TABLE t1(a INT NOT NULL) Engine=InnoDB;
INSERT INTO t1(a) VALUES(1), (2), (3);
COMMIT;
SELECT * FROM t1;
a
1
2
3
DROP TABLE t1;
mtr で valgrind を使う
mtr に専用のオプションがあるのでそれを使うがやや難解。help をみると valgrind 関連のオプションは以下の通り。
Options for valgrind

  callgrind             Instruct valgrind to use callgrind.
  helgrind              Instruct valgrind to use helgrind.
  valgrind              Run the "mysqltest" and "mysqld" executables using
                        valgrind with default options.
  valgrind-all          Synonym for --valgrind.
  valgrind-clients      Run clients started by .test files with valgrind.
  valgrind-mysqld       Run the "mysqld" executable with valgrind.
  valgrind-mysqltest    Run the "mysqltest" and "mysql_client_test" executable
                        with valgrind.
  valgrind-option=ARGS  Option to give valgrind, replaces default option(s), can
                        be specified more then once.
  valgrind-options=ARGS Deprecated, use --valgrind-option.
  valgrind-path=<EXE>   Path to the valgrind executable.
雑に始めるなら --valgrind をつけることで手軽に利用できるがこの場合は --tool=memcheck が固定となる。また実行時におそらく SQL を投げているクライアントに関しても解析が走っているっぽい*2ので実行時間がかかることを考えるとあまりうれしくない。
というわけで --valgrind-mysqld とともに以下のように massif *3 を取得する。
$ ./mysql-test/mtr innodb.sample --valgrind-option="--tool=massif" --valgrind-option="--stacks=yes" --valgrind-option="--time-unit=B" --valgrind-mysqld
以下は雑な実行ログ
build$ ./mysql-test/mtr innodb.sample --valgrind-option="--tool=massif" --valgrind-option="--stacks=yes" --valgrind-option="--time-unit=B" --valgrind-mysqld
Logging: /home/lrf141/mysqlProject/mysql-server/mysql-test/mysql-test-run.pl  innodb.sample --valgrind-option=--tool=massif --valgrind-option=--stacks=yes --valgrind-option=--time-unit=B --valgrind-mysqld
MySQL Version 8.4.7
Turning on valgrind for all executables
Running valgrind with options " --tool=massif --stacks=yes --time-unit=B --suppressions=/home/lrf141/mysqlProject/mysql-server/mysql-test/valgrind.supp "
Turning off --check-testcases to save time when valgrinding
Checking supported features
 - Binaries are debug compiled
Using 'all' suites
Collecting tests
Checking leftover processes
Removing old var directory
Creating var directory '/home/lrf141/mysqlProject/mysql-server/build/mysql-test/var'
Installing system database
Using parallel: 1

==============================================================================
                  TEST NAME                       RESULT  TIME (ms) COMMENT
------------------------------------------------------------------------------
[ 33%] innodb.sample                             [ pass ]  11978
[ 66%] shutdown_report                           [ pass ]
[100%] valgrind_report                           [ pass ]
------------------------------------------------------------------------------
The servers were restarted 0 times
The servers were reinitialized 0 times
Spent 11.978 of 610 seconds executing testcases

Completed: All 3 tests were successful.
そうすると mysql-test 直下の var/log/ 以下に massif ファイルが生成される
build$ ll mysql-test/var/log/
total 1304
drwxrwxr-x 2 lrf141 lrf141   4096 Dec 27 10:13 ./
drwxrwxr-x 8 lrf141 lrf141   4096 Dec 27 10:08 ../
-rw-rw-r-- 1 lrf141 lrf141   2769 Dec 27 10:08 bootstrap.log
-rw-r--r-- 1 lrf141 lrf141  19165 Dec 27 10:13 mysqld.1.err
-rw-r--r-- 1 lrf141 lrf141   1958 Dec 27 10:12 mysqld.1.err.warnings
-rw-r----- 1 lrf141 lrf141 463928 Dec 27 10:13 mysqld.1_massif.out.229134
-rw-r--r-- 1 lrf141 lrf141   1033 Dec 27 10:12 mysqltest.log
-rw-r--r-- 1 lrf141 lrf141 819628 Dec 27 10:12 mysqltest_massif.out.229186
-rw-r----- 1 lrf141 lrf141      5 Dec 27 10:12 timer
ので、ms_print などで見れば OK
--------------------------------------------------------------------------------
Command:            /home/lrf141/mysqlProject/mysql-server/build/runtime_output_directory/mysqld --defaults-group-suffix=.1 --defaults-file=/home/lrf141/mysqlProject/mysql
-server/build/mysql-test/var/my.cnf --log-output=file --explain-format=TRADITIONAL_STRICT --loose-debug-sync-timeout=6000 --core-file
Massif arguments:   --massif-out-file=/home/lrf141/mysqlProject/mysql-server/build/mysql-test/var/log/mysqld.1_massif.out.%p --stacks=yes --time-unit=B
ms_print arguments: mysql-test/var/log/mysqld.1_massif.out.229134
--------------------------------------------------------------------------------


    MB
337.2^                                                    #
     |                                            @:::::::#       :::::@::::::
     |      @   @:::::::@::@::::::::::::::::@:::::@:::::: #::::::@:::::@::::::
     |      @::@@: :::::@::@: :::: :::::::: @: :::@:::::: #::::::@:::::@::::::
     |  ::::@: @@: :::::@::@: :::: :::::::: @: :::@:::::: #::::::@:::::@::::::
     |  : ::@: @@: :::::@::@: :::: :::::::: @: :::@:::::: #::::::@:::::@::::::
     |  : ::@: @@: :::::@::@: :::: :::::::: @: :::@:::::: #::::::@:::::@::::::
     |  : ::@: @@: :::::@::@: :::: :::::::: @: :::@:::::: #::::::@:::::@::::::
     |  : ::@: @@: :::::@::@: :::: :::::::: @: :::@:::::: #::::::@:::::@::::::
     |  : ::@: @@: :::::@::@: :::: :::::::: @: :::@:::::: #::::::@:::::@::::::
     |  : ::@: @@: :::::@::@: :::: :::::::: @: :::@:::::: #::::::@:::::@::::::
     |  : ::@: @@: :::::@::@: :::: :::::::: @: :::@:::::: #::::::@:::::@::::::
     | @: ::@: @@: :::::@::@: :::: :::::::: @: :::@:::::: #::::::@:::::@::::::
     | @: ::@: @@: :::::@::@: :::: :::::::: @: :::@:::::: #::::::@:::::@::::::
     | @: ::@: @@: :::::@::@: :::: :::::::: @: :::@:::::: #::::::@:::::@::::::
     | @: ::@: @@: :::::@::@: :::: :::::::: @: :::@:::::: #::::::@:::::@::::::
     | @: ::@: @@: :::::@::@: :::: :::::::: @: :::@:::::: #::::::@:::::@::::::
     | @: ::@: @@: :::::@::@: :::: :::::::: @: :::@:::::: #::::::@:::::@::::::
     | @: ::@: @@: :::::@::@: :::: :::::::: @: :::@:::::: #::::::@:::::@::::::
     | @: ::@: @@: :::::@::@: :::: :::::::: @: :::@:::::: #::::::@:::::@::::::
   0 +----------------------------------------------------------------------->GB
     0                                                                   66.04

Number of snapshots: 80
 Detailed snapshots: [1, 7, 9, 10, 17, 20, 35, 41, 50 (peak), 60, 70]

--------------------------------------------------------------------------------
  n        time(B)         total(B)   useful-heap(B) extra-heap(B)    stacks(B)
--------------------------------------------------------------------------------
  0              0                0                0             0            0
  1  1,227,783,424      157,753,360      157,473,853       268,075       11,432
mtr で Gperftools Heap Profiler
プロファイルを取得するにはディレクトリを環境変数で指定して実行するか、実装にプロファイル取得を足すかの二択だが後者は面倒なので前者で行う。
そして mtr 実施時につけるとそれは mtr のもの全てを取得してしまいかねないので*4なので mtr 実施時に起動される mysqld に対して追加で環境変数を与える方法をとる。それには --mysqld-env オプションを使えば良い。
build$ ./mysql-test/mtr innodb.sample --mysqld-env=HEAPPROFILE=/tmp/mysql-test
Logging: /home/lrf141/mysqlProject/mysql-server/mysql-test/mysql-test-run.pl  innodb.sample --mysqld-env=HEAPPROFILE=/tmp/mysql-test
MySQL Version 8.4.7
Checking supported features
 - Binaries are debug compiled
Using 'all' suites
Collecting tests
Checking leftover processes
Removing old var directory
Creating var directory '/home/lrf141/mysqlProject/mysql-server/build/mysql-test/var'
Installing system database
Using parallel: 1

==============================================================================
                  TEST NAME                       RESULT  TIME (ms) COMMENT
------------------------------------------------------------------------------
[ 50%] innodb.sample                             [ pass ]   3428
[100%] shutdown_report                           [ pass ]
------------------------------------------------------------------------------
The servers were restarted 0 times
The servers were reinitialized 0 times
Spent 3.428 of 435 seconds executing testcases

Completed: All 2 tests were successful.
すると結果のファイルが出力されている
$ ll /tmp | grep mysql-test
drwxrwxr-x  2 lrf141 lrf141    4096 Dec 27 12:49 mysql-test/
-rw-r--r--  1 lrf141 lrf141  395204 Dec 27 13:03 mysql-test.0001.heap
-rw-rw----  1 lrf141 lrf141 1048560 Dec 27 13:03 mysql-test.0002.heap
-rw-rw----  1 lrf141 lrf141 1048572 Dec 27 13:03 mysql-test.0003.heap
-rw-rw----  1 lrf141 lrf141 1048573 Dec 27 13:05 mysql-test.0004.heap
なので順当に変換すれば OK
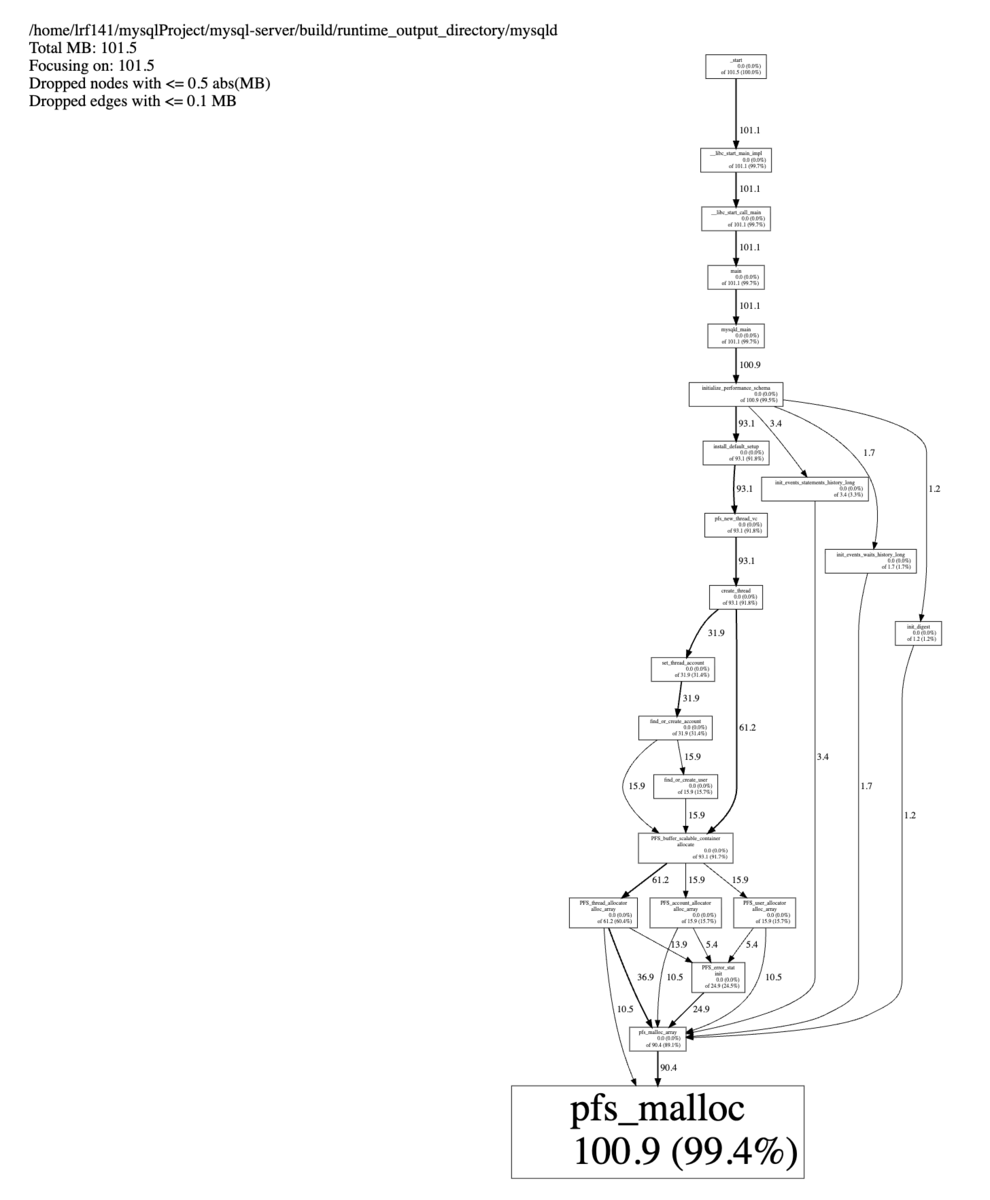
$ pprof-symbolize --svg ~/mysqlProject/mysql-server/build/runtime_output_directory/mysqld /tmp/mysql-test.0001.heap > mysql-test.svg
Using local file /home/lrf141/mysqlProject/mysql-server/build/runtime_output_directory/mysqld.
Using local file /tmp/mysql-test.0001.heap.
Dropping nodes with <= 0.5 MB; edges with <= 0.1 abs(MB)
svg はこんな感じで生成できる↓
おわりに
というわけでざっくりまとめたわけですが、まとめてみてこれを参考にする人が現れることがあるのかという気持ちになってきました
MySQL の接続圧縮制御について
はじめに
どうも、ブログを更新せず数年が経過していたことに驚きが隠せないけんつです。流石にネタはいくつかあるのでぼちぼち書いていこうと思います。というわけで今回は MySQL の接続圧縮制御というやつについて割と調べたのでそれについてです。
前提
今回も実装の話になると思いますが、対象のバージョンは 8.4.7 とします。
接続圧縮制御 is 何
とは言っても接続圧縮制御(Connection Compression Control)という名称自体あまり馴染みがないと思われるわけですが、要はこれです。
dev.mysql.com
ざっくり何かというと、特定のクライアントから MySQL に対して通信を行う場合に、そのパケットを圧縮して実際に送信するデータの容量を減らすことができるというナイスなやつ。現段階では基本的に zstd, zlib, uncompressed を選択できる。
とはいえ、勝手になんでもかんでも圧縮されると MySQL 側で受け取った時に圧縮データを展開するために CPU をバカ喰いしかねないので、サーバー側で許可している圧縮アルゴリズムとクライアントが使用する圧縮アルゴリズムをネゴシエーションすると言ったナイスな仕組みもあります。これは例えば公式のコマンド群(mysql, mysqldump, mysqlbinlog, ...)では大抵利用可能だが、一点注意が必要でこの接続圧縮制御というものにはレガシーなものが存在する。どうしてレガシーなのか非常に謎でどうしてそのような分岐が入ったのかも謎であるがそちらを使うと zlib を使って圧縮するか圧縮しないかの2択になるのである。
さらに罠なのはこれは接続圧縮制御を使う側の話であるが事情を知らなければ --compress という一見それらしいフラグがレガシーな接続圧縮制御のクライアントオプションであり、--compression-algorithms=
現時点では --compression-algorithms を使うのが良いだろう。
接続圧縮制御と C API
何で多くの公式コマンドで利用かというと、そもそもにこの接続圧縮制御というものは libmysqlclient によって提供される C API で汎用的に利用することが可能なのである。
どうやって使うかというと、コネクションに関わるあれこれは mysql_options 関数によって制御できるので、その関数に MYSQL_OPT_COMPRESSION_ALGORITHMS フラグと使いたい圧縮アルゴリズムを文字列で渡してやれば良い。
もし zstd で圧縮したい場合は圧縮レベルを MYSQL_OPT_ZSTD_COMPRESSION_LEVEL で同様に指定することもできる。
dev.mysql.com
例えば以下のような形になるはずである。
// zstd or zlib で圧縮したい場合
mysql_options(mysql, MYSQL_OPT_COMPRESSION_ALGORITHMS, "zstd,zlib");
というわけで案外簡単に何でも圧縮できるようになる。
と、それだけの話であるならばドキュメントで十分なのでわざわざブログにまとめることもないわけで本題はここから。
どのように実現しているのか
前述の mysql_options が MYSQL_OPT_COMPRESSION_ALGORITHMS と共に呼ばれると与えられたアルゴリズムのリストを探索しながらフラグを更新していく。
またこの時共通して行われるのは mysql->options.compress を true にすることである。
 case MYSQL_OPT_COMPRESSION_ALGORITHMS: {
      std::string compress_option(static_cast<const char *>(arg));
      std::vector<std::string> list;
      parse_compression_algorithms_list(compress_option, list);
      ENSURE_EXTENSIONS_PRESENT(&mysql->options);
      mysql->options.extension->connection_compressed = true;
      mysql->options.client_flag &=
          ~(CLIENT_COMPRESS | CLIENT_ZSTD_COMPRESSION_ALGORITHM);
      mysql->options.compress = false;
      auto it = list.begin();
      unsigned int cnt = 0;
      while (it != list.end() && cnt < COMPRESSION_ALGORITHM_COUNT_MAX) {
        std::string value = *it;
        switch (get_compression_algorithm(value)) {
          case enum_compression_algorithm::MYSQL_ZLIB:
            mysql->options.client_flag |= CLIENT_COMPRESS;
            mysql->options.compress = true;
            break;
          case enum_compression_algorithm::MYSQL_ZSTD:
            mysql->options.client_flag |= CLIENT_ZSTD_COMPRESSION_ALGORITHM;
            mysql->options.compress = true;
            break;
          case enum_compression_algorithm::MYSQL_UNCOMPRESSED:
            mysql->options.extension->connection_compressed = false;
            break;
          case enum_compression_algorithm::MYSQL_INVALID:
            break;  // report error
        }
        it++;
        cnt++;
      }
      if (cnt)
        EXTENSION_SET_STRING(&mysql->options, compression_algorithm,
                             static_cast<const char *>(arg));
      mysql->options.extension->total_configured_compression_algorithms = cnt;
https://github.com/mysql/mysql-server/blob/mysql-8.4.7/sql-common/client.cc#L8772-L8807
ここで現れる MYSQL 構造体という非常にわかりにくい名前のものがあるが、一度そのデータ構造について触れておく。MYSQL 構造体の宣言は次のようになっていて、ざっとみるとある程度理解できると思うが MySQL において何らかの通信を行う時には大抵必要となる情報が保持される。user, passwd あたりは言わずもがな、馴染み深いところで行くと thread_id 等だろうか。この構造体の利用用途は多岐にわたるので詳細をここで説明はしないが MySQL の C API を利用する場合、特に何らかのコネクションを利用する場合は確実に必要とされる構造体である。この構造体は mysql_real_connect 関数により接続を確立するために利用され、 mysql_init 関数により初期化することができる。
typedef struct MYSQL {
  NET net;                     /* Communication parameters */
  unsigned char *connector_fd; /* ConnectorFd for SSL */
  char *host, *user, *passwd, *unix_socket, *server_version, *host_info;
  char *info, *db;
  struct CHARSET_INFO *charset;
  MYSQL_FIELD *fields;
  struct MEM_ROOT *field_alloc;
  uint64_t affected_rows;
  uint64_t insert_id;      /* id if insert on table with NEXTNR */
  uint64_t extra_info;     /* Not used */
  unsigned long thread_id; /* Id for connection in server */
  unsigned long packet_length;
  unsigned int port;
  unsigned long client_flag, server_capabilities;
  unsigned int protocol_version;
  unsigned int field_count;
  unsigned int server_status;
  unsigned int server_language;
  unsigned int warning_count;
  struct st_mysql_options options;
  enum mysql_status status;
  enum enum_resultset_metadata resultset_metadata;
  bool free_me;   /* If free in mysql_close */
  bool reconnect; /* set to 1 if automatic reconnect */

  /* session-wide random string */
  char scramble[SCRAMBLE_LENGTH + 1];

  LIST *stmts; /* list of all statements */
  const struct MYSQL_METHODS *methods;
  void *thd;
  /*
    Points to boolean flag in MYSQL_RES  or MYSQL_STMT. We set this flag
    from mysql_stmt_close if close had to cancel result set of this object.
  */
  bool *unbuffered_fetch_owner;
  void *extension;
} MYSQL;
https://github.com/mysql/mysql-server/blob/mysql-8.4.7/include/mysql.h#L300-L338
というわけで話は前後してしまったが mysql_init 関数により MYSQL 構造体を初期化したのちに mysql_real_connect 関数を呼ぶ前、つまり接続を実際に確立する前に mysql_options 関数を使用して設定を与えることにより C API で提供される様々な接続制御を行うことができる。
前述の mysql_options 関数で行っていたことをこれらの情報を踏まえて整理すると、MySQL に対して接続を確立する際に何らかの接続圧縮制御を利用するという情報を設定したということである。
これで接続圧縮が利用できるようになったわけだがそれを実現しているのはさらに難解な仕組みが待っている。これは先に実際にパケットを圧縮解凍する処理を見つけたのでわかったことだが mysql_real_connect を呼び出した場合の処理で mysql_compress_context なるデータ構造を生成している。これはみるとある程度見えてくるが、zstd, zlib それぞれで圧縮する場合どのような圧縮が必要かという情報がまとまっている。例えば zstd の圧縮レベルなどもこのメンバにある mysql_zstd_compress_context で管理されている。
typedef struct mysql_compress_context {
  enum enum_compression_algorithm algorithm;  ///< Compression algorithm name.
  union {
    mysql_zlib_compress_context zlib_ctx;  ///< Context information of zlib.
    mysql_zstd_compress_context zstd_ctx;  ///< Context information of zstd.
  } u;
} mysql_compress_context;
https://github.com/mysql/mysql-server/blob/mysql-8.4.7/include/my_compress.h#L74-L80
参考までに mysql_compress_context_init がコールされる時点のバックトレースを記載する。
(lldb) bt
* thread #1, queue = 'com.apple.main-thread', stop reason = breakpoint 1.1
  * frame #0: 0x0000000100110268 mysql`mysql_compress_context_init(cmp_ctx=0x0000000100d95658, algorithm=MYSQL_ZSTD, compression_level=3) at my_compress.cc:62:24
    frame #1: 0x0000000100044220 mysql`csm_prep_select_database(ctx=0x000000016fdfdaa8) at client.cc:7128:5
    frame #2: 0x0000000100046c20 mysql`connect_helper(ctx=0x000000016fdfdaa8) at client.cc:6210:14
    frame #3: 0x000000010004e488 mysql`cli_connect(ctx=0x000000016fdfdaa8) at client.cc:6235:10
    frame #4: 0x0000000100047348 mysql`mysql_real_connect(mysql=0x0000000100905288, host=0x0000000000000000, user="root", passwd=0x0000000000000000, db=0x0000000000000000, port=0, unix_socket=0x0000000000000000, client_flag=66560) at client.cc:6270:10
    frame #5: 0x00000001000136dc mysql`sql_real_connect(host=0x0000000000000000, database=0x0000000000000000, user="root", (null)=0x0000000000000000, silent=0) at mysql.cc:4983:11
    frame #6: 0x0000000100005048 mysql`sql_connect(host=0x0000000000000000, database=0x0000000000000000, user="root", silent=0) at mysql.cc:5215:13
    frame #7: 0x0000000100003334 mysql`main(argc=0, argv=0x0000000100d8a078) at mysql.cc:1443:7
    frame #8: 0x0000000182a41d54 dyld`start + 7184
なぜこのようなことになっているのかというと、実際に接続を確立してデータをやり取りするのは MYSQL 構造体の中に含まれる NET 構造体を利用するためである。ここにはパケットのバッファやどこまで読んだ書いたのかというポジションからファイルディスクリプタと MySQL とのやりとりにおける一段低レイヤーな情報が集まっている。MySQL における送受信においてはこれを使っているのである。
typedef struct NET {
  MYSQL_VIO vio;
  unsigned char *buff, *buff_end, *write_pos, *read_pos;
  my_socket fd; /* For Perl DBI/dbd */
  /**
    Set if we are doing several queries in one
    command ( as in LOAD TABLE ... FROM MASTER ),
    and do not want to confuse the client with OK at the wrong time
  */
  unsigned long remain_in_buf, length, buf_length, where_b;
  unsigned long max_packet, max_packet_size;
  unsigned int pkt_nr, compress_pkt_nr;
  unsigned int write_timeout, read_timeout, retry_count;
  int fcntl;
  unsigned int *return_status;
  unsigned char reading_or_writing;
  unsigned char save_char;
  bool compress;
  unsigned int last_errno;
  unsigned char error;
  /** Client library error message buffer. Actually belongs to struct MYSQL. */
  char last_error[MYSQL_ERRMSG_SIZE];
  /** Client library sqlstate buffer. Set along with the error message. */
  char sqlstate[SQLSTATE_LENGTH + 1];
  /**
    Extension pointer, for the caller private use.
    Any program linking with the networking library can use this pointer,
    which is handy when private connection specific data needs to be
    maintained.
    The mysqld server process uses this pointer internally,
    to maintain the server internal instrumentation for the connection.
  */
  void *extension;
} NET;
https://github.com/mysql/mysql-server/blob/mysql-8.4.7/include/mysql_com.h#L915-L948
そしてここで最も厄介なものが末尾のメンバーとして宣言されている void *extension である。コメントを雑に理解するならば、ほぼどのような用途にでも使われると書かれているのである。これは大変な魔境となっている。
しかし残念ながら、前述の mysql_compress_context の実体はここにあるのである。接続圧縮に関する情報はこの extension なるメンバにあるというのが共通理解のようで、これをあろうことか NET_EXTENSION * にキャストする。そうすることで先ほど設定した compress_ctx を取得できるのである。
struct NET_EXTENSION {
  NET_ASYNC *net_async_context;
  mysql_compress_context compress_ctx;
};
https://github.com/mysql/mysql-server/blob/mysql-8.4.7/include/mysql_async.h#L199-L202
というわけでようやくこれで圧縮に辿り着けるのだが、ここまでの情報をクライアントが認識した上で実際にデータを MySQL に送信する際に送りたいパケットを圧縮するのである。
ここも全体像を先にある程度把握していないと理解が難しいので先に都合の良いところで止めたバックトレースを貼る。
(lldb) bt
* thread #1, queue = 'com.apple.main-thread', stop reason = breakpoint 2.1
  * frame #0: 0x000000010011052c mysql`my_compress(comp_ctx=0x00000001016dd658, packet="#", len=0x000000016fdfd8c0, complen=0x000000016fdfd820) at my_compress.cc:282:3
    frame #1: 0x0000000100063070 mysql`compress_packet(net=0x0000000100905288, packet="#", length=0x000000016fdfd8c0) at net_serv.cc:1270:7
    frame #2: 0x000000010006177c mysql`net_write_packet(net=0x0000000100905288, packet="#", length=39) at net_serv.cc:1319:19
    frame #3: 0x0000000100061640 mysql`net_flush(net=0x0000000100905288) at net_serv.cc:297:9
    frame #4: 0x0000000100062f80 mysql`net_write_command(net=0x0000000100905288, command='\x03', header="", head_len=2, packet="select @@version_comment limit 1", len=32) at net_serv.cc:915:55
    frame #5: 0x0000000100037e10 mysql`cli_advanced_command(mysql=0x0000000100905288, command=COM_QUERY, header="", header_length=2, arg="select @@version_comment limit 1", arg_length=32, skip_check=true, stmt=0x0000000000000000) at client.cc:1388:7
    frame #6: 0x00000001000490c4 mysql`mysql_send_query(mysql=0x0000000100905288, query="select @@version_comment limit 1", length=32) at client.cc:7948:13
    frame #7: 0x0000000100049d7c mysql`mysql_real_query(mysql=0x0000000100905288, query="select @@version_comment limit 1", length=32) at client.cc:8061:7
    frame #8: 0x0000000100022cc8 mysql`mysql_query(mysql=0x0000000100905288, query="select @@version_comment limit 1") at libmysql.cc:677:10
    frame #9: 0x000000010000567c mysql`server_version_string(con=0x0000000100905288) at mysql.cc:5367:10
    frame #10: 0x0000000100003454 mysql`main(argc=0, argv=0x00000001016d2078) at mysql.cc:1470:12
    frame #11: 0x0000000182a41d54 dyld`start + 7184
これのわかりやすいところから見ていくとまずここである。圧縮の true or false が true ならば compress_packet というまさにそれだろうという処理を呼び出す。
  const bool do_compress = net->compress;
  if (do_compress) {
    if ((packet = compress_packet(net, packet, &length)) == nullptr) {
      net->error = NET_ERROR_SOCKET_UNUSABLE;
      net->last_errno = ER_OUT_OF_RESOURCES;
      /* In the server, allocation failure raises a error. */
      net->reading_or_writing = 0;
https://github.com/mysql/mysql-server/blob/mysql-8.4.7/sql-common/net_serv.cc#L1317-L1323
compress_packet で重要な部分はここである。ここまでに紹介した compress_context なるものも登場し、my_compress というどう見ても低レイヤーな処理を次に呼び出す。そこをさらに辿っていくと送信したいパケットのポインタがありそれを zstd or zlib で圧縮しているのである。
static uchar *compress_packet(NET *net, const uchar *packet, size_t *length) {
  uchar *compr_packet;
  size_t compr_length = 0;
  const uint header_length = NET_HEADER_SIZE + COMP_HEADER_SIZE;

  compr_packet = (uchar *)my_malloc(key_memory_NET_compress_packet,
                                    *length + header_length, MYF(MY_WME));

  if (compr_packet == nullptr) return nullptr;

  memcpy(compr_packet + header_length, packet, *length);

  mysql_compress_context *compress_ctx = compress_context(net);

  /* Compress the encapsulated packet. */
  if (my_compress(compress_ctx, compr_packet + header_length, length,
                  &compr_length)) {
    /*
      If the length of the compressed packet is larger than the
      original packet, the original packet is sent uncompressed.
    */
    compr_length = 0;
  }
https://github.com/mysql/mysql-server/blob/mysql-8.4.7/sql-common/net_serv.cc#L1255-L1277
bool my_compress(mysql_compress_context *comp_ctx, uchar *packet, size_t *len,
                 size_t *complen) {
  DBUG_ENTER("my_compress");
  if (*len < MIN_COMPRESS_LENGTH) {
    *complen = 0;
    DBUG_PRINT("note", ("Packet too short: Not compressed"));
  } else {
    uchar *compbuf = my_compress_alloc(comp_ctx, packet, len, complen);
    if (!compbuf) DBUG_RETURN(*complen ? 0 : 1);
    memcpy(packet, compbuf, *len);
    my_free(compbuf);
  }
  DBUG_RETURN(0);
}
https://github.com/mysql/mysql-server/blob/mysql-8.4.7/mysys/my_compress.cc#L280-L293
これにて圧縮編は終了となる。MySQL の C API はこのようにしてネットワーク通じてをやり取りするパケットを圧縮・転送し、受け取るとそれを展開している。
解凍に関しては概ねこれの逆のことが行われていると考えて問題ない。むしろここまで共通化されているので今回紹介したものと別のパスが存在する方が不思議なぐらいだと思う。
またこのようなナイスな仕組みがあるので帯域をクソデカデータで食い潰してしまいそうな時は雑に接続圧縮制御を試してみると良いかもしれない。
余談
なぜ今回このような話をしたのかというと、これは Clone プラグインでも使われている*1ためである。
面白いことに Clone プラグインがリモートクローンを行う時は今回ここで紹介した方法をそのまま通る。つまり C API を利用することができて mysql_options 関数で圧縮アルゴリズムを指定し圧縮することができ、それをそのまま別のインスタンスで受け取り展開するということが本当にそのままできるのである。
これは諸々の事情によりレガシーな接続圧縮制御しか使えない、つまり zlib 圧縮しか Clone プラグインで zstd も扱えるようにナウい方の接続圧縮を使えるようにしようぜというパッチを送ったのでより理解が深まった。
bugs.mysql.com
おわりに
というわけで今回はいつになく高レイヤー(?)な話題でした。MySQL を取り巻くコネクションの実装なんかは初めて読むことになったのでなかなか難解でしたがこれもこれで面白いネタでした。
頼むからパッチ取り込まれてくれぇ。
*1:正確には前述のレガシーな接続圧縮制御が使われている
MySQL にいい感じにコントリビュートする方法(非公式)
この記事は MySQLのカレンダー | Advent Calendar 2023 - Qiita 6 日目の記事です。
はじめに
どうも、この時期になるといつかのメリークリスマスを無限ループするけんつです。
世間の MySQLer を生業とする皆さん、唐突に MySQL をビルドしたくなったり急に徹夜でデバッグしたくなることが良くあると思いますが「なんだこれは」という挙動に遭遇することも稀によくあると思います。
例えば、何故かビルドがどこかのバージョンからすんなり通らなくなったり、どこかのバージョンから急にクソデカトランザクションの commit でハングったりといったやつです。
そんな時に気合いで原因を突き止め、これで直るんじゃないかというところまで辿り着き、更には修正方法までわかってしまったケースも稀によくあると思います。
今回はそんな気の触れた MySQLer に捧げる、カッとなって*1 パッチを書いてしまった場合のコントリビュートの方法についてです。
補足
流石にこの記事を書くためだけにまた Oracle のアカウントを作るのは面倒だったので、実際にパッチを出した時の記憶を思い出しながら書くのでところどころ正確さに欠ける場合があるかもしれないです。
コントリビュートしようぜ
登場人物
さほどいないですが、最初に登場人物を紹介します。
まずはみんな大好き MySQL Bugs です。バグ報告だったり、パッチを送りつける場合は基本的にこいつを経由します。
bugs.mysql.com
次は OSS にコントリビュートしたことのある人だと、CLA への署名を求められるという経験をしたことがある人もいるかと思います。それの Oracle 版の OCA というやつです。鬼門です。
oca.opensource.oracle.com
Oracle Profile の作成
登場人物を把握したところで MySQL Bugs からパッチを送りつけましょう、というだけですが Bug report/Contributionsを投げるためにまずは Oracle のアカウントが必要になります。
まずはこれを作らんことには何も始まらないので MySQL Bugs の右上にある register からアカウントを作成します。メールアドレスだったり、会社情報だったり諸々を入力して作成するだけです。
OCA への署名
Oracle Profile を作成したからといって勇み足でパッチを投げつける前に深呼吸をしてから OCA への署名を行います。OCA への署名がないと、パッチを受け取ってもらえない & OCA が Approve されるまでに担当者と何往復かコメントのやり取りが発生するので双方の手間を省くためにまずは署名からです。
OCA への署名は上のリンクから元気に作成していきます。種類は Company Agreement, Individual Agreement の二つがありますが、パッチの事情に応じて選択してください。*2
大体個人の時間で発掘したものしかやったことはないので、Individual Agreement への署名を前提にこのあとは語ります。
署名時に Oracle Profile の作成と同様の内容を書いたり・勝手に反映されたりするので必須情報のうち大半で苦労することはないと思います。
問題は Github account と Project です。github で管理されている mysql-server repository から、プルリクを投げる場合はこいつがかなり重要な役割を果たすそうです。果たすそうです、というのは Pull Request 経由でコントリビュートをやったことがないのですが、野生の有識者に聞くと OCA に署名した時に登録した github のアカウントから Pull Request が飛んでくると MySQL bugs にコピーして Pull Request を Close するという動きになるらしいということがわかりました。登録しておいて損はないはずなので、正しく入力しておきましょう。ただし、自分がやったことがないので Pull Request 経由は今回のスコープ外とします。
次に単純に罠な Project です。ここはコントリビュートしたいプロジェクトを選択して、プロジェクト単位で OCA への署名を行うようですが。単純にドロップダウンメニューを開いただけでは MySQL という文字列が見つからないです。しかし、検索ボックスに MySQL と入力すると関連プロジェクトが山のように出てくるという動きになっています。
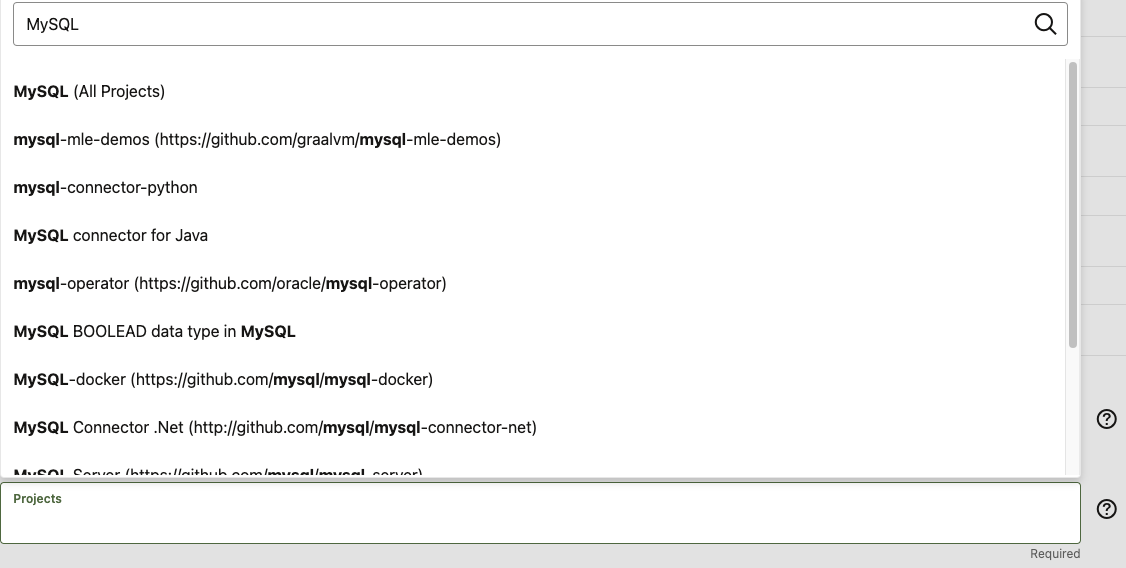
こんな感じです↑
MySQL 関連のプロジェクトで、コントリビュートしたプロジェクトだけを選択しても良いですし、自分だといつ何時 MySQL 関連のどのプロジェクトにコントリビュートするかわからないので All Projects にしています。
この罠をかわしたら、元気に次へと進めていくだけです。
ただし、最後の罠が待ち受けていて OCA の一覧から Approve されるのを待った方が良いです。署名はこの Approve をもって完了とするみたいです。*3
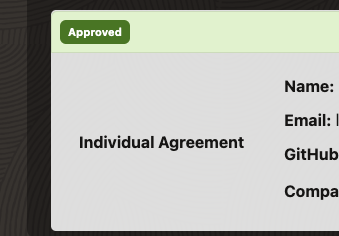
これです↑
魂のコントリビュート
ここまで怒涛の準備を超えていよいよ MySQL Bugs からコントリビュートです。
まずは MySQL Bugs の上のメニューにある Report a Bug を開き、起きている問題や再現方法、想定される解決策などを必要なものを埋めてまずは起票します。
残念な英語力ですが、自分が送ったパッチの時は以下のように書きました。
bugs.mysql.com
ここまできたら、起票したバグの Contribute タブから patch ファイルを添付してあげます。これは patch コマンドの出力結果か、良いかわからないですが git diff の出力でも受け取ってもらえたのでどちらかでやるのが無難だと思います。
そうすると担当者からコメントがやってくるので、必要に応じてやり取りをしながら気長に行末を見守ってコントリビュートは完了です。
追記 2023/12/06 19:34
このブログを投稿した後に yoku さんから情報がやってきた。どうやら Pull Request 経由のバグレポを発掘したと。
ちなみにgithubから転記されたhttps://t.co/CNL96SPQ8Aはこんな感じです。https://t.co/r1kNS6MJuC
— yoku0825 (@yoku0825) 2023年12月6日
github側はこんなhttps://t.co/apBImSc7XJ
— yoku0825 (@yoku0825) 2023年12月6日
MySQL Bugs: #102405: Contribution: openssl v3 support
openssl v3 support by macvk · Pull Request #320 · mysql/mysql-server · GitHub
これらの様子を見ていると、Pull Request の Description と Diff がそのまま MySQL Bugs の Description と Contributions に反映されて Close されている。
差分がでかくなったらこれのほうが楽なのでよい情報をもらった。
無事に取り込まれると…
git log に名前が残る
よくあるやつです。嬉しい。
❯ git log --grep="35442825"
commit 385ccdd4e1c53eadfdeed9080a80c8fa8162808c
Author: Tor Didriksen <tor.didriksen@oracle.com>
Date:   Tue May 30 15:42:51 2023 +0200

    Bug#35442825 Build fails with LANG=ja_JP.UTF-8

    Set LANG=C in the environment when executing readelf, to avoid any
    problems with non-ascii output.

    Patch is based on a contribution from Kento Takeuchi.

    Change-Id: I2a7e4dead3208aa5bb65f7d86b766e76fbb7b9c5
    (cherry picked from commit 37a5f2c7a195d021186e40eef9738646e87ead74)
ブログで紹介してもらえる
粋な計らいです。*4 とっても嬉しい。
MySQL 8.1.0 is out ! Thank you for the contributions !!
https://blogs.oracle.com/mysql/post/mysql-810-is-out-thank-you-for-the-contributions
This new Innovation Release already contains contributions from our great Community. MySQL 8.1.0 contains patches from Meta (Facebook), Allen Long, Daniël van Eeden, Brent Gardner, Yura Sorokin (Percona) and Kento Takeuchi.
...
#111190 – Build fails with LANG=ja_JP.UTF-8 – Kento Takeuchi
Handler と SELECT と時々 WHERE 句
はじめに
どうも、最近どうにか出費を抑えようとしているけんつです。今回は自作ストレージエンジンをやっていて気になった SELECT と WHERE が組み合わさったときの挙動について書こうかなと思います。自作ストレージエンジンを前提にしているので、InnoDB などはこの限りではない可能性が十分にあります。
環境
- MySQL 8.0.33
- PopOS 22.04
- 自作ストレージエンジン
前提
また例によって mtr を使ってクエリを実行しながらデバッグする。mtr に食わせる test, result ファイルは以下の通り。やっていることは単純で2つレコードを追加して、条件にマッチするレコードが1つ返ってくるというもの。
CREATE TABLE t1(id INT)Engine=Toybox;
INSERT INTO t1(id) VALUES(1);
INSERT INTO t1(id) VALUES(2);
SELECT * FROM t1 WHERE id > 1;
DROP TABLE t1;
CREATE TABLE t1(id INT)Engine=Toybox;
INSERT INTO t1(id) VALUES(1);
INSERT INTO t1(id) VALUES(2);
SELECT * FROM t1 WHERE id > 1;
id
2
DROP TABLE t1;
このテストを実行すると無事に PASS するので元気にデバッグする。toybox というのは今作っている自作ストレージエンジンの名前です。
$ ./mtr toybox.select_where
Logging: /home/lrf141/mysqlProject/mysql-server/mysql-test/mysql-test-run.pl  toybox.select_where
MySQL Version 8.0.33
Checking supported features
 - Binaries are debug compiled
Using 'all' suites
Collecting tests
Checking leftover processes
 - found old pid 30513 in 'mysqld.1.pid', killing it...
   ok!
Removing old var directory
Creating var directory '/home/lrf141/mysqlProject/mysql-server/build/mysql-test/var'
Installing system database
Using parallel: 1

==============================================================================
                  TEST NAME                       RESULT  TIME (ms) COMMENT
------------------------------------------------------------------------------
[ 50%] toybox.select_where                       [ pass ]     21
[100%] shutdown_report                           [ pass ]
------------------------------------------------------------------------------
The servers were restarted 0 times
The servers were reinitialized 0 times
Spent 0.021 of 25 seconds executing testcases

Completed: All 2 tests were successful.
さぁデバッグタイムだ
後は元気にデバッグしていくだけなので読む。
確実に発生している事実
まずは何がどうなっているか事実を確認する。
現段階の実装では rnd_next という(おそらく)テーブルスキャンで各行を読み出すメソッドを通過する。これが一体何回通過するのかというのが重要な事柄となる。
(rr) c
Continuing.

Thread 2 hit Breakpoint 1, ha_toybox::rnd_next (this=0x7f9750482300, buf=0x7f9750464e70 "\377") at /home/lrf141/mysqlProject/mysql-server/storage/toybox/ha_toybox.cc:553
warning: Source file is more recent than executable.
553	  filesort.cc, records.cc, sql_handler.cc, sql_select.cc, sql_table.cc and
(rr) c
Continuing.

Thread 2 hit Breakpoint 1, ha_toybox::rnd_next (this=0x7f9750482300, buf=0x7f9750464e70 "") at /home/lrf141/mysqlProject/mysql-server/storage/toybox/ha_toybox.cc:553
553	  filesort.cc, records.cc, sql_handler.cc, sql_select.cc, sql_table.cc and
(rr) c
Continuing.

Thread 2 hit Breakpoint 1, ha_toybox::rnd_next (this=0x7f9750482300, buf=0x7f9750464e70 "") at /home/lrf141/mysqlProject/mysql-server/storage/toybox/ha_toybox.cc:553
553	  filesort.cc, records.cc, sql_handler.cc, sql_select.cc, sql_table.cc and
(rr) c
Continuing.
通過するのは 3 回となった。これが INSERT した 2 回ではないのは rnd_next の終了条件として HA_ERR_END_OF_FILE を返す必要があるからである。詳しくは以下の記事で紹介している。
rabbitfoot141.hatenablog.com
これによってテーブルスキャンの場合に限り WHERE 句で指定された条件によって handler が一致するレコードを取得するわけではなく、全てのレコードを返しているということがわかる。
ちなみにそのときの backtrace は以下の通り。
(rr) bt
#0  ha_toybox::rnd_next (this=0x7f9750482300, buf=0x7f9750464e70 "")
    at /home/lrf141/mysqlProject/mysql-server/storage/toybox/ha_toybox.cc:553
#1  0x0000555ae12d5992 in handler::ha_rnd_next (this=0x7f9750482300, buf=0x7f9750464e70 "")
    at /home/lrf141/mysqlProject/mysql-server/sql/handler.cc:2970
#2  0x0000555ae14b000a in TableScanIterator::Read (this=0x7f97504868f8)
    at /home/lrf141/mysqlProject/mysql-server/sql/iterators/basic_row_iterators.cc:219
#3  0x0000555ae16fe8c3 in FilterIterator::Read (this=0x7f9750486940)
    at /home/lrf141/mysqlProject/mysql-server/sql/iterators/composite_iterators.cc:76
#4  0x0000555ae1009aeb in Query_expression::ExecuteIteratorQuery (this=0x7f975039ee00,
    thd=0x7f97506bc4a0) at /home/lrf141/mysqlProject/mysql-server/sql/sql_union.cc:1770
#5  0x0000555ae1009e87 in Query_expression::execute (this=0x7f975039ee00, thd=0x7f97506bc4a0)
    at /home/lrf141/mysqlProject/mysql-server/sql/sql_union.cc:1823
#6  0x0000555ae0f49104 in Sql_cmd_dml::execute_inner (this=0x7f97504851c8,
    thd=0x7f97506bc4a0) at /home/lrf141/mysqlProject/mysql-server/sql/sql_select.cc:799
#7  0x0000555ae0f484f5 in Sql_cmd_dml::execute (this=0x7f97504851c8, thd=0x7f97506bc4a0)
    at /home/lrf141/mysqlProject/mysql-server/sql/sql_select.cc:578
#8  0x0000555ae0ebb4d4 in mysql_execute_command (thd=0x7f97506bc4a0, first_level=true)
    at /home/lrf141/mysqlProject/mysql-server/sql/sql_parse.cc:4714
#9  0x0000555ae0ebd91d in dispatch_sql_command (thd=0x7f97506bc4a0,
    parser_state=0x7f972c5e69f0)
    at /home/lrf141/mysqlProject/mysql-server/sql/sql_parse.cc:5363
#10 0x0000555ae0eb2da3 in dispatch_command (thd=0x7f97506bc4a0, com_data=0x7f972c5e7340,
    command=COM_QUERY) at /home/lrf141/mysqlProject/mysql-server/sql/sql_parse.cc:2050
#11 0x0000555ae0eb0c0d in do_command (thd=0x7f97506bc4a0)
    at /home/lrf141/mysqlProject/mysql-server/sql/sql_parse.cc:1439
#12 0x0000555ae10fd937 in handle_connection (arg=0x555ae8b3d910)
    at /home/lrf141/mysqlProject/mysql-server/sql/conn_handler/connection_handler_per_thread.cc:302
#13 0x0000555ae33989fe in pfs_spawn_thread (arg=0x555ae9f44d30)
    at /home/lrf141/mysqlProject/mysql-server/storage/perfschema/pfs.cc:3042
#14 0x00007f976b694ac3 in start_thread (arg=<optimized out>) at ./nptl/pthread_create.c:442
#15 0x00007f976b725bf4 in clone () at ../sysdeps/unix/sysv/linux/x86_64/clone.S:100
FilterIterator::Read, Query_expression::ExecuteIteratorQuery とか大変それっぽいやつを通過しているのでそのあたりをこれから見ている。
いざ server レイヤーダイブ
流石に Query Executor はコードパスのうち、どこを見ていけばいいのかわからないので今回も元気に先頭から読んでいくという筋力プレイに走る。
最初は TableScanIterator::Read から読む。
    while ((tmp = table()->file->ha_rnd_next(m_record))) {
      /*
       ha_rnd_next can return RECORD_DELETED for MyISAM when one thread is
       reading and another deleting without locks.
       */
      if (tmp == HA_ERR_RECORD_DELETED && !thd()->killed) continue;
      return HandleError(tmp);
    }
    if (m_examined_rows != nullptr) {
      ++*m_examined_rows;
    }
まずこの部分で handler の rnd_next を行ってテーブルから一行読み出す。これは前述のブログ記事に詳細を書いているので解説は省く。
次にたどり着くのは FilterIterator::Read の以下の実装となる。
    int err = m_source->Read();
    if (err != 0) return err;

    bool matched = m_condition->val_int();

    if (thd()->killed) {
      thd()->send_kill_message();
      return 1;
    }

    /* check for errors evaluating the condition */
    if (thd()->is_error()) return 1;

    if (!matched) {
      m_source->UnlockRow();
      continue;
    }

    // Successful row.
    return 0;
https://github.com/mysql/mysql-server/blob/mysql-8.0.33/sql/iterators/composite_iterators.cc#L76-L95
ここで大変重要になってくるのは、 m_condition->val_int() である。
何故かというと一行目と二行目で今回のテストケースでは二行目のみが結果としてクライアントに返却されるが、この戻り値の bool が各行の読み出しで結果が異なるためである。
# 一行目の呼び出しと matched の値
(rr) c
Continuing.

Thread 41 hit Breakpoint 4, TableScanIterator::Read (this=0x7f97504868f8) at /home/lrf141/mysqlProject/mysql-server/sql/iterators/basic_row_iterators.cc:219
219	    while ((tmp = table()->file->ha_rnd_next(m_record))) {
(rr) c
Continuing.

Thread 41 hit Breakpoint 1, ha_toybox::rnd_next (this=0x7f9750482300, buf=0x7f9750464e70 "\377") at /home/lrf141/mysqlProject/mysql-server/storage/toybox/ha_toybox.cc:553
warning: Source file is more recent than executable.
553	  filesort.cc, records.cc, sql_handler.cc, sql_select.cc, sql_table.cc and
(rr) c
Continuing.

Thread 41 hit Breakpoint 3, FilterIterator::Read (this=0x7f9750486940) at /home/lrf141/mysqlProject/mysql-server/sql/iterators/composite_iterators.cc:81
81	    if (thd()->killed) {
(rr) p matched
$15 = false


# 二行目の呼び出しと matched の値
(rr) c
Continuing.

Thread 41 hit Breakpoint 4, TableScanIterator::Read (this=0x7f97504868f8) at /home/lrf141/mysqlProject/mysql-server/sql/iterators/basic_row_iterators.cc:219
219	    while ((tmp = table()->file->ha_rnd_next(m_record))) {
(rr) c
Continuing.

Thread 41 hit Breakpoint 1, ha_toybox::rnd_next (this=0x7f9750482300, buf=0x7f9750464e70 "") at /home/lrf141/mysqlProject/mysql-server/storage/toybox/ha_toybox.cc:553
553	  filesort.cc, records.cc, sql_handler.cc, sql_select.cc, sql_table.cc and
(rr) c
Continuing.

Thread 41 hit Breakpoint 3, FilterIterator::Read (this=0x7f9750486940) at /home/lrf141/mysqlProject/mysql-server/sql/iterators/composite_iterators.cc:81
81	    if (thd()->killed) {
(rr) p matched
$16 = true
確かに一行目と二行目で matched の値がそれぞれ false, true になっている。matched が false になると continue に入り、次の行を読み出すようにする。
そしてその処理が何に影響を与えるかというと、Query_expression::ExecuteIteratorQuery にある以下の実装を呼び出すかどうかに影響を与える。
    for (;;) {
      int error = m_root_iterator->Read();
      DBUG_EXECUTE_IF("bug13822652_1", thd->killed = THD::KILL_QUERY;);

      if (error > 0 || thd->is_error())  // Fatal error
        return true;
      else if (error < 0)
        break;
      else if (thd->killed)  // Aborted by user
      {
        thd->send_kill_message();
        return true;
      }

      ++*send_records_ptr;

      if (query_result->send_data(thd, *fields)) {
        return true;
      }
      thd->get_stmt_da()->inc_current_row_for_condition();
    }
https://github.com/mysql/mysql-server/blob/mysql-8.0.33/sql/sql_union.cc#L1769-L1789
この段階では m_root_iterator->Read() は rnd_next の戻り値となる 0 を引っ張ってくるので、 query_result->send_data の呼び出しに到達する。
まとめ
というわけでテーブルスキャンを伴う SELECT と WHERE 句の扱いは以下のようになっている。
- handler はテーブルに含まれる全ての行を読み出す
- server layer でそれが条件に合うかどうかを判定する
- 条件に一致する場合はレコードの情報をクライアントに返却する
おわりに
結構雑にはなったが、大まかな処理としてテーブルスキャンが伴う WHERE 句の動きについて理解することができた。
今回知り得た情報以上の内容を知りたくなった場合は条件をどのように構造体として表現しているか、Iterator の選択はどのように行っているかを見ていく必要がありそうだが、今回はここまでとする。
テーブルスキャン時に呼ばれる rnd_next については分かってきたが、これと似たようなインターフェースを持つものに UPDATE, DELETE が存在するのでその場合の WHERE 句はどのように制御されるのかをまた今度調べてみようと思う。
LOAD DATA LOCAL INFILE ~ REPLACE INTO と時々ロックでしっかり沼った
はじめに
どうも、最近よく主要人物が闇落ちする映像作品を薦められがちなけんつです。最近色々あって LOAD DATA LOCAL INFILE ~ REPLACE INTO ~ を呼んだときにどういった処理が走るのか、特に metadata lock 周りが気になったのでそれについて書きます。大層ご立派なことを書いているが、完全にメモである。ブログ書きながら読める分量じゃなかった。
そして余談だが、どこで何のロックがかかっているのかを知りたい時が最近多すぎる。
書きながら思ったこと
本当は InnoDB まで見ようと思ったが思いの外手強かったので metadata lock 周りが中心になりそう。むしろ metadata lock も全部読めているか怪しい。
検証する
前提
LOAD DATA INFILE を実行した場合に通過するコードパスがわからなかったので、以下の test, result ファイルを用意して mtr を実行し debug trace を取得する。
create table t1(id int)Engine=InnoDB;
insert into t1(id) values(1),(2),(3),(4);
load data infile '../../std_data/hoge.csv' replace into table t1 fields terminated by ',';
drop table t1;
create table t1(id int)Engine=InnoDB;
insert into t1(id) values(1),(2),(3),(4);
load data infile '../../std_data/hoge.csv' replace into table t1 fields terminated by ',';
drop table t1;
また std_data 以下に適当な名前の csv ファイルを追加し、以下の内容とする。
1
2
3
コードパスを掴む
コードパスがわからないとどこを見れば良いかわからないので debug trace, gdb とにらめっこしながらどこを通過するのか、ということからまず調べる必要がある。
debug trace を見ていると以下のような処理がいくつか流れていることがわかる。
...
T@11: | | | | >Sql_cmd_load_table::execute_inner
T@11: | | | | | >THD::set_current_stmt_binlog_format_row_if_mixed
T@11: | | | | | <THD::set_current_stmt_binlog_format_row_if_mixed
T@11: | | | | | >open_and_lock_tables
T@11: | | | | | | >open_tables
T@11: | | | | | | | THD::enter_stage: 'Opening tables' /home/lrf141/mysqlProject/mysql-server/sql/sql_base.cc:5795
T@11: | | | | | | | >PROFILING::status_change
T@11: | | | | | | | <PROFILING::status_change
T@11: | | | | | | | >open_and_process_table
T@11: | | | | | | | | >debug_sync
T@11: | | | | | | | | | debug_sync_point: hit: 'open_and_process_table'
T@11: | | | | | | | | <debug_sync
T@11: | | | | | | | | tcache: opening table: 'test'.'file_tbl'  item: 0x7f3d4c29f008
T@11: | | | | | | | | >ha_innobase::update_thd
T@11: | | | | | | | | | ha_innobase::update_thd: user_thd: 0x7f3d4c5a9a30 -> 0x7f3d4c5a9a30
T@11: | | | | | | | | | >innobase_trx_init
T@11: | | | | | | | | | <innobase_trx_init
T@11: | | | | | | | | <ha_innobase::update_thd
T@11: | | | | | | | <open_and_process_table
T@11: | | | | | | | >debug_sync
T@11: | | | | | | | | debug_sync_point: hit: 'open_tables_after_open_and_process_table'
T@11: | | | | | | | <debug_sync
T@11: | | | | | | | open_tables: returning: 0
T@11: | | | | | | <open_tables
T@11: | | | | | | >lock_tables
...
コードパスはわからないとしても write_row は通過するはずと、ha_innobase::write_row にブレークポイントを貼って更に実行する。
すると以下の back trace となる。
(gdb) bt
#0  ha_innobase::write_row (this=0x7fff3c125620, record=0x7fff3c00f1f0 "\375\001")
    at /home/lrf141/mysqlProject/mysql-server/storage/innobase/handler/ha_innodb.cc:8972
#1  0x000055555917c6f2 in handler::ha_write_row (this=0x7fff3c125620,
    buf=0x7fff3c00f1f0 "\375\001")
    at /home/lrf141/mysqlProject/mysql-server/sql/handler.cc:7953
#2  0x0000555559529e78 in write_record (thd=0x7fff3c001050, table=0x7fff3c0f54d0,
    info=0x7fffd85f2ef0, update=0x0)
    at /home/lrf141/mysqlProject/mysql-server/sql/sql_insert.cc:1811
#3  0x0000555559534cc4 in Sql_cmd_load_table::read_sep_field (this=0x7fff3c11ed28,
    thd=0x7fff3c001050, info=..., table_list=0x7fff3c11ee60, read_info=..., enclosed=...,
    skip_lines=0) at /home/lrf141/mysqlProject/mysql-server/sql/sql_load.cc:1109
#4  0x0000555559532d19 in Sql_cmd_load_table::execute_inner (this=0x7fff3c11ed28,
    thd=0x7fff3c001050, handle_duplicates=DUP_REPLACE)
    at /home/lrf141/mysqlProject/mysql-server/sql/sql_load.cc:570
#5  0x00005555595390df in Sql_cmd_load_table::execute (this=0x7fff3c11ed28,
    thd=0x7fff3c001050) at /home/lrf141/mysqlProject/mysql-server/sql/sql_load.cc:2147
#6  0x0000555558d4edfb in mysql_execute_command (thd=0x7fff3c001050, first_level=true)
    at /home/lrf141/mysqlProject/mysql-server/sql/sql_parse.cc:3683
#7  0x0000555558d5491d in dispatch_sql_command (thd=0x7fff3c001050,
    parser_state=0x7fffd85f49f0)
    at /home/lrf141/mysqlProject/mysql-server/sql/sql_parse.cc:5363
#8  0x0000555558d49da3 in dispatch_command (thd=0x7fff3c001050, com_data=0x7fffd85f5340,
    command=COM_QUERY) at /home/lrf141/mysqlProject/mysql-server/sql/sql_parse.cc:2050
#9  0x0000555558d47c0d in do_command (thd=0x7fff3c001050)
    at /home/lrf141/mysqlProject/mysql-server/sql/sql_parse.cc:1439
#10 0x0000555558f94937 in handle_connection (arg=0x55556093e800)
    at /home/lrf141/mysqlProject/mysql-server/sql/conn_handler/connection_handler_per_thread.cc:302
#11 0x000055555b22f9fe in pfs_spawn_thread (arg=0x555560dde4b0)
    at /home/lrf141/mysqlProject/mysql-server/storage/perfschema/pfs.cc:3042
#12 0x00007ffff7294ac3 in start_thread (arg=<optimized out>) at ./nptl/pthread_create.c:442
#13 0x00007ffff7326a40 in clone3 () at ../sysdeps/unix/sysv/linux/x86_64/clone3.S:81Sql_cmd_load_table::execute_inner から先はメソッド名を見るに、各 field を読み込みながらストレージエンジンの write_row を呼び出すという流れになっていると読み取れる。
次に、念の為 ha_innobase::write_row を通過するときに引数として渡ってくるバイナリ列を見る。
(gdb) b ha_innobase::write_row
Breakpoint 3 at 0x55555a614e14: file /home/lrf141/mysqlProject/mysql-server/storage/innobase/handler/ha_innodb.cc, line 8972.
(gdb) c
Continuing.
InnoDB: ###### Diagnostic info printed to the standard error stream

Thread 48 "connection" hit Breakpoint 3, ha_innobase::write_row (this=0x7fff3c125620, record=0x7fff3c00f1f0 "\375\001") at /home/lrf141/mysqlProject/mysql-server/storage/innobase/handler/ha_innodb.cc:8972
8972	{

// 一回目の write_row
(gdb) p *(record)
$9 = 253 '\375'
(gdb) p *(record + 1)
$10 = 1 '\001'

// 二回目の write_row
(gdb) p *(record + 0)
$12 = 253 '\375'
(gdb) p *(record + 1)
$13 = 2 '\002'

// 三回目の write_row
(gdb) p *(record + 0)
$14 = 253 '\375'
(gdb) p *(record + 1)
$15 = 3 '\003'
handler::write_row の引数で渡ってくるバイト列は Row Format になっていて、この場合先頭 1 byte は null bitmap で次の 4 byte が test, result ファイルで宣言した INT カラムの値となっている。
また、ここで四回止まるなら最初に 1~4 を INSERT している部分であるが、三回しか止まらないので前もって用意した csv ファイルの中身が insert される瞬間であるということがわかる。
というわけで Sql_cmd_load_table::execute_inner から先を読んでいけば良いということがわかった。
ちょっと気合を入れて読んでいく
というわけでこのあたりから元気に読んでいく。
https://github.com/mysql/mysql-server/blob/mysql-8.0.33/sql/sql_load.cc#L192-L201
まず最初に気になるのはここ。
  /*
    Bug #34283
    mysqlbinlog leaves tmpfile after termination if binlog contains
    load data infile, so in mixed mode we go to row-based for
    avoiding the problem.
  */
  thd->set_current_stmt_binlog_format_row_if_mixed();
https://github.com/mysql/mysql-server/blob/mysql-8.0.33/sql/sql_load.cc#L226-L232
これの中身を追っていくと、ここにたどり着く
    if ((variables.binlog_format == BINLOG_FORMAT_MIXED) && (in_sub_stmt == 0))
      set_current_stmt_binlog_format_row();
https://github.com/mysql/mysql-server/blob/mysql-8.0.33/sql/sql_class.h#L3396-L3397
inline void set_current_stmt_binlog_format_row() {
    DBUG_TRACE;
    current_stmt_binlog_format = BINLOG_FORMAT_ROW;
    return;
  }
https://github.com/mysql/mysql-server/blob/mysql-8.0.33/sql/sql_class.h#L3401-L3405
binlog_format が MIXED になっている場合で、trigger か stored function の場合は ROW を設定している。
これは
MySQL Bugs: #34283: mysqlbinlog leaves tmpfile after termination if binlog contains load data infile
このバグが関連していて、mysqlbinlog が生成する tmp ファイルが残らないようにするための措置っぽい雰囲気を感じる。が、今はこれは主題ではないのでこのぐらいにする。2008 年頃からずっとあるみたいだし。
これの後は LOAD DATA INFILE で与えられているセパレータなどの文字列が ascii かどうかを確認しているが、これも今回見たいことではないので一旦飛ばす。
もし具体的にどんな値が渡されているかをみたい時は is_ascii() が呼び出されている各変数の m_ptr を参照すれば見ることができる。
次はいよいよ面白くなってきて lock 周りに突入するこの部分。
if (open_and_lock_tables(thd, table_list, 0)) return true;
https://github.com/mysql/mysql-server/blob/mysql-8.0.33/sql/sql_load.cc#L248
これを追っていくと、以下の関数にたどり着く。ここではテーブルを開いてロックをかけるという流れになっているので、それぞれ見ていく。
/**
  Open all tables in list, locks them and optionally process derived tables.

  @param thd		      Thread context.
  @param tables	              List of tables for open and locking.
  @param flags                Bitmap of options to be used to open and lock
                              tables (see open_tables() and mysql_lock_tables()
                              for details).
  @param prelocking_strategy  Strategy which specifies how prelocking algorithm
                              should work for this statement.

  @note
    The thr_lock locks will automatically be freed by close_thread_tables().

  @note
    open_and_lock_tables() is not intended for open-and-locking system tables
    in those cases when execution of statement has started already and other
    tables have been opened. Use open_trans_system_tables_for_read() instead.

  @retval false  OK.
  @retval true   Error
*/

bool open_and_lock_tables(THD *thd, Table_ref *tables, uint flags,
                          Prelocking_strategy *prelocking_strategy) {
https://github.com/mysql/mysql-server/blob/mysql-8.0.33/sql/sql_base.cc#L6542-L6565
この関数をざっと読んでいくと open_table, lock_table という実にそれらしい関数を呼び出しているので、その2つを重点的に読んでいく。
まずは open_table から。
open_table に関する実装をデバッグしながら読んでいくと、まずは以下の実装にたどり着く。
      Table_ref *table;
      if (lock_table_names(thd, *start, thd->lex->first_not_own_table(),
                           ot_ctx.get_timeout(), flags)) {
        error = true;
        goto err;
      }
      for (table = *start; table && table != thd->lex->first_not_own_table();
           table = table->next_global) {
        if (table->mdl_request.is_ddl_or_lock_tables_lock_request() ||
            table->open_strategy == Table_ref::OPEN_FOR_CREATE)
          table->mdl_request.ticket = nullptr;
      }
https://github.com/mysql/mysql-server/blob/mysql-8.0.33/sql/sql_base.cc#L5825-L5836
なんとなく metadata lock に関するであろう処理がいくつかあるが、ここで重要になるのは lock_table_names。
何故かというと lock_table_names を読んでいると LOCK TABLES か DDL によって発生する metadata lock を取得するとあるため。
/**
  Acquire "strong" (SRO, SNW, SNRW) metadata locks on tables used by
  LOCK TABLES or by a DDL statement.

  Acquire lock "S" on table being created in CREATE TABLE statement.

  @note  Under LOCK TABLES, we can't take new locks, so use
         open_tables_check_upgradable_mdl() instead.

  @param thd               Thread context.
  @param tables_start      Start of list of tables on which locks
                           should be acquired.
  @param tables_end        End of list of tables.
  @param lock_wait_timeout Seconds to wait before timeout.
  @param flags             Bitmap of flags to modify how the tables will be
                           open, see open_table() description for details.
  @param schema_reqs       When non-nullptr, pointer to array in which
                           pointers to MDL requests for acquired schema
                           locks to be stored. It is guaranteed that
                           each schema will be present in this array
                           only once.

  @retval false  Success.
  @retval true   Failure (e.g. connection was killed)
*/
bool lock_table_names(THD *thd, Table_ref *tables_start, Table_ref *tables_end,
https://github.com/mysql/mysql-server/blob/mysql-8.0.33/sql/sql_base.cc#L5357-L5382
ここのコメントはとてもよく書かれていて、以下の手順でロックを取得する
- 対象テーブルの一意な Schema Set を作成する
- Schema Set に対して Insert Intention Lock を設定する
- ここまでに設定したロックを取得する
- tablespace 名をロックする
最初の手順は良いとしても、その後にやってくる3つの手順に関しては実装を読みながらでないと自分で書いていても何を言っているかわからなくなる。
ざっくりとまとめるなら 2, 3 はある意味ではひとまとまりになっていて、2 が IX を各オブジェクトに設定し、3 で実際にロックを取得するという流れになっている。
そして最もよくわからなかった 4 についてだが、これは tablespace 名をロックしたいがそれには data dictionary を参照する必要があり、data dictionary を参照するには schema の metadata lock が必要になる、という事情があるらしい。
  /*
    Phase 4: Lock tablespace names. This cannot be done as part
    of the previous phases, because we need to read the
    dictionary to get hold of the tablespace name, and in order
    to do this, we must have acquired a lock on the table.
  */
  return get_and_lock_tablespace_names(thd, tables_start, tables_end,
                                       lock_wait_timeout, flags);
https://github.com/mysql/mysql-server/blob/mysql-8.0.33/sql/sql_base.cc#L5506-L5512
この部分はこの程度で終わらせてしまっても良いが延々とコメントを引用しただけになってしまうので、忘れないために metadata lock を実装ではどうやって取得するかに少しだけ言及する。
まずここまでに挙げた実装を眺めると、やたら MDL_ という文字列を見かけるがこれは大体 metadata lock に関する情報を扱うデータ構造だったりする。
そして特に自分が理解するのに必要だったのは Phase 2 で、特に以下の部分。
    for (const Table_ref *table_l : schema_set) {
      MDL_request *schema_request = new (thd->mem_root) MDL_request;
      if (schema_request == nullptr) return true;
      MDL_REQUEST_INIT(schema_request, MDL_key::SCHEMA, table_l->db, "",
                       MDL_INTENTION_EXCLUSIVE, MDL_TRANSACTION);
      mdl_requests.push_front(schema_request);
      if (schema_reqs) schema_reqs->push_back(schema_request);
    }
https://github.com/mysql/mysql-server/blob/mysql-8.0.33/sql/sql_base.cc#L5454-L5465
mdl_requests というのは要求したい metadata lock のリストとなっている。ここに突っ込んだ情報を元に Phase 3 で metadata lock が取得される。
そして次に面白かったのが MDL_REQUEST_INIT という謎マクロ。特にその引数は面白かった。
何が面白いかというと、MDL_INTENTION_EXCLUSIVE が IX を示していて、MDL_TRANSACTION が設定されているのでトランザクションの終了と共に自動で metadata lock が開放されるという風になっていること。思ったよりロックの寿命が長かった。だいぶ長かった。
というわけでこの後はいつものテーブルを元気に開くやつがやってくる。ここでも metadata lock 周りでなんかやっている雰囲気はあるが、一旦放置で。
信じられないことにここまでが open_table の内容である…。
この後は open_table と対になっている lock_table がやってくる。ここを読み切る気力はもうすでに失われたので、将来の自分のために backtrace だけ貼っておく。
読み切る気力がなくなったのは metadata lock の読解でもうだいぶカロリーを使った上に lock_table がやっているのは ha_innobase::external_lock を呼び出すことなので次回に持ち越し。どのみち自作ストレージエンジンのために一度は読む必要があるので。
(rr) bt
#0  ha_innobase::external_lock (this=0x7fc0b04587c0, thd=0x7fc0b0025f70, lock_type=1)
    at /home/lrf141/mysqlProject/mysql-server/storage/innobase/handler/ha_innodb.cc:18583
#1  0x000055f86b1e815a in handler::ha_external_lock (this=0x7fc0b04587c0,
    thd=0x7fc0b0025f70, lock_type=1)
    at /home/lrf141/mysqlProject/mysql-server/sql/handler.cc:7884
#2  0x000055f86b46a167 in lock_external (thd=0x7fc0b0025f70, tables=0x7fc0b04545d8, count=1)
    at /home/lrf141/mysqlProject/mysql-server/sql/lock.cc:393
#3  0x000055f86b469de5 in mysql_lock_tables (thd=0x7fc0b0025f70, tables=0x7fc0b06f6290,
    count=1, flags=0) at /home/lrf141/mysqlProject/mysql-server/sql/lock.cc:337
#4  0x000055f86ac975a4 in lock_tables (thd=0x7fc0b0025f70, tables=0x7fc0b06f5830, count=1,
    flags=0) at /home/lrf141/mysqlProject/mysql-server/sql/sql_base.cc:6899
#5  0x000055f86ac96b84 in open_and_lock_tables (thd=0x7fc0b0025f70, tables=0x7fc0b06f5830,
    flags=0, prelocking_strategy=0x7fc089be6d60)
    at /home/lrf141/mysqlProject/mysql-server/sql/sql_base.cc:6593
#6  0x000055f86abec248 in open_and_lock_tables (thd=0x7fc0b0025f70, tables=0x7fc0b06f5830,
    flags=0) at /home/lrf141/mysqlProject/mysql-server/sql/sql_base.h:470
#7  0x000055f86b59d818 in Sql_cmd_load_table::execute_inner (this=0x7fc0b06f56f8,
    thd=0x7fc0b0025f70, handle_duplicates=DUP_REPLACE)
    at /home/lrf141/mysqlProject/mysql-server/sql/sql_load.cc:248
#8  0x000055f86b5a50df in Sql_cmd_load_table::execute (this=0x7fc0b06f56f8,
    thd=0x7fc0b0025f70) at /home/lrf141/mysqlProject/mysql-server/sql/sql_load.cc:2147
#9  0x000055f86adbadfb in mysql_execute_command (thd=0x7fc0b0025f70, first_level=true)
    at /home/lrf141/mysqlProject/mysql-server/sql/sql_parse.cc:3683
#10 0x000055f86adc091d in dispatch_sql_command (thd=0x7fc0b0025f70,
    parser_state=0x7fc089be89f0)
    at /home/lrf141/mysqlProject/mysql-server/sql/sql_parse.cc:5363
#11 0x000055f86adb5da3 in dispatch_command (thd=0x7fc0b0025f70, com_data=0x7fc089be9340,
    command=COM_QUERY) at /home/lrf141/mysqlProject/mysql-server/sql/sql_parse.cc:2050
#12 0x000055f86adb3c0d in do_command (thd=0x7fc0b0025f70)
    at /home/lrf141/mysqlProject/mysql-server/sql/sql_parse.cc:1439
#13 0x000055f86b000937 in handle_connection (arg=0x55f87418e1b0)
    at /home/lrf141/mysqlProject/mysql-server/sql/conn_handler/connection_handler_per_thread.cc:302
#14 0x000055f86d29b9fe in pfs_spawn_thread (arg=0x55f874192080)
    at /home/lrf141/mysqlProject/mysql-server/storage/perfschema/pfs.cc:3042
#15 0x00007fc0c8c94ac3 in start_thread (arg=<optimized out>) at ./nptl/pthread_create.c:442
#16 0x00007fc0c8d25bf4 in clone () at ../sysdeps/unix/sysv/linux/x86_64/clone.S:100
おわりに
というわけでハイパー駆け足になったが metadata lock を中心に理解が深まった部分がいくつかある。特に metadata lock がどういう処理で取得されているか、取得までに必要な諸々のデータ構造についてわかったのはでかい。
そしてまだちゃんとデバッグしたわけではないが LOAD DATA LOCAL INFILE ~ REPLACE INTO は普通に data_locks を眺めていると
という風になっている。はず。
というわけで次回作にご期待ください。
MySQL 探索記 ~ Unit Test がビルドされる時に必要なライブラリとリンク~
はじめに
どうも、ユニットテストをかけるようになったぜと前回の記事で喜んでいたらバイナリの書き込みで盛大に 1byte ずれていることに気がついてしまったけんつです。
rabbitfoot141.hatenablog.com
最近、MySQL ごとビルドする場合に unittest/ 以外のディレクトリでユニットテストをサポートする方法について書いたが、いざ自分が作っているプラグインをビルドしてみると link 周りでコケることが分かったのでその原因についてまとめる。
前回との差分
前回の記事で gunit_large, server_unittest_library の2つがユニットテストをサポートする上で重要なライブラリであるという話を書いたが、それは間違いではなくそのまま。
問題は MYSQL_ADD_PLUGIN で指定する plugin_args にあった。ここに特定のキーワードが含まれる場合とそうでない場合で上記のライブラリにリンクされるかどうか結果が変わってくることが分かったというのが今回ここでする話である。
本題
前回の記事で紹介した手順にしたがってビルドをしていくと、MYSQL_ADD_PLUGIN の引数次第では gtest を含むユニットテストをビルドした場合に「undefined reference to」という見慣れたエラーが出てくる場合がある。
というわけでやや適当に書いてしまった前回記事から更に少し調べる必要に迫られたというわけである。
一度冷静になる
gunit_large の役割については前述の通りであるというので間違いないと思われるので、問題は servier_unittest_library をリンクするあたりにあるということがわかる。
というわけで今一度 server_unittest_library のビルドについて調べる。
 MERGE_LIBRARIES_SHARED(server_unittest_library SKIP_INSTALL LINK_PUBLIC
      sql_main
      ${MYSQLD_STATIC_PLUGIN_LIBS}
      minchassis
      ext::icu
      # Import some core symbols. Other symbols needed by the unit test
      # executables are pulled in transitively by symbol dependencies.
      #
      # Since everything has visibility("default") the library will
      # export every symbol pulled in from the source libraries.
      #
      # If some symbols are still missing, they will be picked up from
      # dependent libraries, since we LINK_PUBLIC.
      # To see what symbols we need to import, remove LINK_PUBLIC above.
      #
      # The strings library uses visibility=hidden for all symbols,
      # except those explicitly tagged with MYSQL_STRINGS_EXPORT.
      # If we get ODR violations for executables using server_unittest_library,
      # it means the symbol has been found in strings and
      # server_unittest_library, which means the unit test is using
      # some non-exported symbol from strings.
      EXPORTS
      builtin_perfschema_plugin            # Pulls in the whole server.
      mysql_service_mysql_rwlock_v1        # Pulls in minchassis
      )
sql_main などは置いておいて、今ここで一番怪しそうなのは MYSQL_STATIC_PLUGIN_LIBS である。というかどうみてもそれぐらいしか可変であると思われるものはない。
頑張って実装を追う
ここで更に冷静になって、MYSQL_ADD_PLUGIN を読み直す。
...
# Update mysqld dependencies
SET (MYSQLD_STATIC_PLUGIN_LIBS ${MYSQLD_STATIC_PLUGIN_LIBS}
${target} ${ARG_LINK_LIBRARIES} CACHE INTERNAL "" FORCE)
...
どうやらここに到達させる必要があるというので間違いないと思われる。
というわけで、ここに MESSAGE をつけて cmake を実行してみることにする。
DEFAULT
まずは前回と同じ様に STORAGE_ENGINE DEFAULT な状態。
debug: ARCHIVE, MYSQLD_STATIC_PLUGIN_LIBS: archive;extra::rapidjson;ext::zlib
debug: BLACKHOLE, MYSQLD_STATIC_PLUGIN_LIBS: archive;extra::rapidjson;ext::zlib;blackhole;extra::rapidjson;ext::zlib
debug: CSV, MYSQLD_STATIC_PLUGIN_LIBS: archive;extra::rapidjson;ext::zlib;blackhole;extra::rapidjson;ext::zlib;csv;extra::rapidjson
debug: EXAMPLE, MYSQLD_STATIC_PLUGIN_LIBS: archive;extra::rapidjson;ext::zlib;blackhole;extra::rapidjson;ext::zlib;csv;extra::rapidjson;example;ext::zlib
debug: FEDERATED, MYSQLD_STATIC_PLUGIN_LIBS: archive;extra::rapidjson;ext::zlib;blackhole;extra::rapidjson;ext::zlib;csv;extra::rapidjson;example;ext::zlib;federated;extra::rapidjson
debug: HEAP, MYSQLD_STATIC_PLUGIN_LIBS: archive;extra::rapidjson;ext::zlib;blackhole;extra::rapidjson;ext::zlib;csv;extra::rapidjson;example;ext::zlib;federated;extra::rapidjson;heap;heap_library;extra::rapidjson
debug: INNOBASE, MYSQLD_STATIC_PLUGIN_LIBS: archive;extra::rapidjson;ext::zlib;blackhole;extra::rapidjson;ext::zlib;csv;extra::rapidjson;example;ext::zlib;federated;extra::rapidjson;heap;heap_library;extra::rapidjson;innobase;sql_dd;sql_gis;ext::zlib;ext::lz4;extra::rapidjson
debug: MYISAM, MYSQLD_STATIC_PLUGIN_LIBS: archive;extra::rapidjson;ext::zlib;blackhole;extra::rapidjson;ext::zlib;csv;extra::rapidjson;example;ext::zlib;federated;extra::rapidjson;heap;heap_library;extra::rapidjson;innobase;sql_dd;sql_gis;ext::zlib;ext::lz4;extra::rapidjson;myisam;myisam_library
debug: MYISAMMRG, MYSQLD_STATIC_PLUGIN_LIBS: archive;extra::rapidjson;ext::zlib;blackhole;extra::rapidjson;ext::zlib;csv;extra::rapidjson;example;ext::zlib;federated;extra::rapidjson;heap;heap_library;extra::rapidjson;innobase;sql_dd;sql_gis;ext::zlib;ext::lz4;extra::rapidjson;myisam;myisam_library;myisammrg;extra::rapidjson
debug: NDBCLUSTER, MYSQLD_STATIC_PLUGIN_LIBS: archive;extra::rapidjson;ext::zlib;blackhole;extra::rapidjson;ext::zlib;csv;extra::rapidjson;example;ext::zlib;federated;extra::rapidjson;heap;heap_library;extra::rapidjson;innobase;sql_dd;sql_gis;ext::zlib;ext::lz4;extra::rapidjson;myisam;myisam_library;myisammrg;extra::rapidjson;ndbcluster;ndbclient_static;extra::rapidjson
debug: PERFSCHEMA, MYSQLD_STATIC_PLUGIN_LIBS: archive;extra::rapidjson;ext::zlib;blackhole;extra::rapidjson;ext::zlib;csv;extra::rapidjson;example;ext::zlib;federated;extra::rapidjson;heap;heap_library;extra::rapidjson;innobase;sql_dd;sql_gis;ext::zlib;ext::lz4;extra::rapidjson;myisam;myisam_library;myisammrg;extra::rapidjson;ndbcluster;ndbclient_static;extra::rapidjson;perfschema;extra::rapidjson;ext::zlib
debug: TEMPTABLE, MYSQLD_STATIC_PLUGIN_LIBS: archive;extra::rapidjson;ext::zlib;blackhole;extra::rapidjson;ext::zlib;csv;extra::rapidjson;example;ext::zlib;federated;extra::rapidjson;heap;heap_library;extra::rapidjson;innobase;sql_dd;sql_gis;ext::zlib;ext::lz4;extra::rapidjson;myisam;myisam_library;myisammrg;extra::rapidjson;ndbcluster;ndbclient_static;extra::rapidjson;perfschema;extra::rapidjson;ext::zlib;temptable;extra::rapidjson
debug: NGRAM_PARSER, MYSQLD_STATIC_PLUGIN_LIBS: archive;extra::rapidjson;ext::zlib;blackhole;extra::rapidjson;ext::zlib;csv;extra::rapidjson;example;ext::zlib;federated;extra::rapidjson;heap;heap_library;extra::rapidjson;innobase;sql_dd;sql_gis;ext::zlib;ext::lz4;extra::rapidjson;myisam;myisam_library;myisammrg;extra::rapidjson;ndbcluster;ndbclient_static;extra::rapidjson;perfschema;extra::rapidjson;ext::zlib;temptable;extra::rapidjson;ngram_parser
debug: MYSQLX, MYSQLD_STATIC_PLUGIN_LIBS: archive;extra::rapidjson;ext::zlib;blackhole;extra::rapidjson;ext::zlib;csv;extra::rapidjson;example;ext::zlib;federated;extra::rapidjson;heap;heap_library;extra::rapidjson;innobase;sql_dd;sql_gis;ext::zlib;ext::lz4;extra::rapidjson;myisam;myisam_library;myisammrg;extra::rapidjson;ndbcluster;ndbclient_static;extra::rapidjson;perfschema;extra::rapidjson;ext::zlib;temptable;extra::rapidjson;ngram_parser;mysqlx;ext::libevent;ext::icu;mysqlxmessages_lite;libprotobuf-lite;extra::rapidjson;ext::lz4;ext::zstd;ext::zlib
これを見るに server_unittest_library にリンクされるものが MYSQL_ADD_PLUGIN の該当箇所を通過するたびに追加されていくという理解で合っていることがわかる。
実際に DEFAULT がついている場合に通過する部分を見るに WITH_${plugin} = 1 にしているので実装とも合っている。
  IF(ARG_DEFAULT)
    IF(NOT DEFINED WITH_${plugin} AND
       NOT DEFINED WITHOUT_${plugin} AND
       NOT DEFINED WITH_${plugin}_STORAGE_ENGINE)
      SET(WITH_${plugin} 1)
    ENDIF()
  ENDIF()
というわけで次にこの部分に到達するために必要な IF を見る。
  # Build either static library or module
  IF (WITH_${plugin} AND NOT ARG_MODULE_ONLY)
WITH_${plugin} が true で MODULE_ONLY でない場合に到達するらしい。
MODULE_ONLY は引数で渡す場合にその shared library のみを作成してくれるもので、これを指定していると LINK_LIBRARIES の段階でエラーとなるので今回は関係ないといえば関係ないが、ユニットテストをサポートするときには必要ないだろう。
問題はその他である。WITH_${plugin} が true 相当にならないといけないので、その周辺を見ていく。
WITH_"${plugin}"_STORAGE_ENGINE
まずは -DWITH_EXAMPLE_STORAGE_ENGINE=1 にして DEFAULT を外した場合。
debug: ARCHIVE, MYSQLD_STATIC_PLUGIN_LIBS: archive;extra::rapidjson;ext::zlib
debug: BLACKHOLE, MYSQLD_STATIC_PLUGIN_LIBS: archive;extra::rapidjson;ext::zlib;blackhole;extra::rapidjson;ext::zlib
debug: CSV, MYSQLD_STATIC_PLUGIN_LIBS: archive;extra::rapidjson;ext::zlib;blackhole;extra::rapidjson;ext::zlib;csv;extra::rapidjson
debug: EXAMPLE, MYSQLD_STATIC_PLUGIN_LIBS: archive;extra::rapidjson;ext::zlib;blackhole;extra::rapidjson;ext::zlib;csv;extra::rapidjson;example;ext::zlib
debug: FEDERATED, MYSQLD_STATIC_PLUGIN_LIBS: archive;extra::rapidjson;ext::zlib;blackhole;extra::rapidjson;ext::zlib;csv;extra::rapidjson;example;ext::zlib;federated;extra::rapidjson
debug: HEAP, MYSQLD_STATIC_PLUGIN_LIBS: archive;extra::rapidjson;ext::zlib;blackhole;extra::rapidjson;ext::zlib;csv;extra::rapidjson;example;ext::zlib;federated;extra::rapidjson;heap;heap_library;extra::rapidjson
debug: INNOBASE, MYSQLD_STATIC_PLUGIN_LIBS: archive;extra::rapidjson;ext::zlib;blackhole;extra::rapidjson;ext::zlib;csv;extra::rapidjson;example;ext::zlib;federated;extra::rapidjson;heap;heap_library;extra::rapidjson;innobase;sql_dd;sql_gis;ext::zlib;ext::lz4;extra::rapidjson
debug: MYISAM, MYSQLD_STATIC_PLUGIN_LIBS: archive;extra::rapidjson;ext::zlib;blackhole;extra::rapidjson;ext::zlib;csv;extra::rapidjson;example;ext::zlib;federated;extra::rapidjson;heap;heap_library;extra::rapidjson;innobase;sql_dd;sql_gis;ext::zlib;ext::lz4;extra::rapidjson;myisam;myisam_library
debug: MYISAMMRG, MYSQLD_STATIC_PLUGIN_LIBS: archive;extra::rapidjson;ext::zlib;blackhole;extra::rapidjson;ext::zlib;csv;extra::rapidjson;example;ext::zlib;federated;extra::rapidjson;heap;heap_library;extra::rapidjson;innobase;sql_dd;sql_gis;ext::zlib;ext::lz4;extra::rapidjson;myisam;myisam_library;myisammrg;extra::rapidjson
debug: NDBCLUSTER, MYSQLD_STATIC_PLUGIN_LIBS: archive;extra::rapidjson;ext::zlib;blackhole;extra::rapidjson;ext::zlib;csv;extra::rapidjson;example;ext::zlib;federated;extra::rapidjson;heap;heap_library;extra::rapidjson;innobase;sql_dd;sql_gis;ext::zlib;ext::lz4;extra::rapidjson;myisam;myisam_library;myisammrg;extra::rapidjson;ndbcluster;ndbclient_static;extra::rapidjson
debug: PERFSCHEMA, MYSQLD_STATIC_PLUGIN_LIBS: archive;extra::rapidjson;ext::zlib;blackhole;extra::rapidjson;ext::zlib;csv;extra::rapidjson;example;ext::zlib;federated;extra::rapidjson;heap;heap_library;extra::rapidjson;innobase;sql_dd;sql_gis;ext::zlib;ext::lz4;extra::rapidjson;myisam;myisam_library;myisammrg;extra::rapidjson;ndbcluster;ndbclient_static;extra::rapidjson;perfschema;extra::rapidjson;ext::zlib
debug: TEMPTABLE, MYSQLD_STATIC_PLUGIN_LIBS: archive;extra::rapidjson;ext::zlib;blackhole;extra::rapidjson;ext::zlib;csv;extra::rapidjson;example;ext::zlib;federated;extra::rapidjson;heap;heap_library;extra::rapidjson;innobase;sql_dd;sql_gis;ext::zlib;ext::lz4;extra::rapidjson;myisam;myisam_library;myisammrg;extra::rapidjson;ndbcluster;ndbclient_static;extra::rapidjson;perfschema;extra::rapidjson;ext::zlib;temptable;extra::rapidjson
debug: NGRAM_PARSER, MYSQLD_STATIC_PLUGIN_LIBS: archive;extra::rapidjson;ext::zlib;blackhole;extra::rapidjson;ext::zlib;csv;extra::rapidjson;example;ext::zlib;federated;extra::rapidjson;heap;heap_library;extra::rapidjson;innobase;sql_dd;sql_gis;ext::zlib;ext::lz4;extra::rapidjson;myisam;myisam_library;myisammrg;extra::rapidjson;ndbcluster;ndbclient_static;extra::rapidjson;perfschema;extra::rapidjson;ext::zlib;temptable;extra::rapidjson;ngram_parser
debug: MYSQLX, MYSQLD_STATIC_PLUGIN_LIBS: archive;extra::rapidjson;ext::zlib;blackhole;extra::rapidjson;ext::zlib;csv;extra::rapidjson;example;ext::zlib;federated;extra::rapidjson;heap;heap_library;extra::rapidjson;innobase;sql_dd;sql_gis;ext::zlib;ext::lz4;extra::rapidjson;myisam;myisam_library;myisammrg;extra::rapidjson;ndbcluster;ndbclient_static;extra::rapidjson;perfschema;extra::rapidjson;ext::zlib;temptable;extra::rapidjson;ngram_parser;mysqlx;ext::libevent;ext::icu;mysqlxmessages_lite;libprotobuf-lite;extra::rapidjson;ext::lz4;ext::zstd;ext::zlib
このパターンは MYSQL_ADD_PLUGIN の実装を見ても WITH_${plugin} = 1 を設定しているので、実装と合っている。
  IF(WITH_${plugin}_STORAGE_ENGINE
    OR WITH_{$plugin}
    AND NOT WITHOUT_${plugin}_STORAGE_ENGINE
    AND NOT WITHOUT_${plugin}
    AND NOT ARG_MODULE_ONLY)

    SET(WITH_${plugin} 1)
https://github.com/mysql/mysql-server/blob/mysql-8.0.33/cmake/plugin.cmake#L96-L102
MANDATORY
次に MANDATORY を指定した場合。これは必須ストレージエンジン or Plugin という意味合いで、見た範囲では InnoDB にこれがついている。
debug: ARCHIVE, MYSQLD_STATIC_PLUGIN_LIBS: archive;extra::rapidjson;ext::zlib
debug: BLACKHOLE, MYSQLD_STATIC_PLUGIN_LIBS: archive;extra::rapidjson;ext::zlib;blackhole;extra::rapidjson;ext::zlib
debug: CSV, MYSQLD_STATIC_PLUGIN_LIBS: archive;extra::rapidjson;ext::zlib;blackhole;extra::rapidjson;ext::zlib;csv;extra::rapidjson
debug: EXAMPLE, MYSQLD_STATIC_PLUGIN_LIBS: archive;extra::rapidjson;ext::zlib;blackhole;extra::rapidjson;ext::zlib;csv;extra::rapidjson;example;ext::zlib
debug: FEDERATED, MYSQLD_STATIC_PLUGIN_LIBS: archive;extra::rapidjson;ext::zlib;blackhole;extra::rapidjson;ext::zlib;csv;extra::rapidjson;example;ext::zlib;federated;extra::rapidjson
debug: HEAP, MYSQLD_STATIC_PLUGIN_LIBS: archive;extra::rapidjson;ext::zlib;blackhole;extra::rapidjson;ext::zlib;csv;extra::rapidjson;example;ext::zlib;federated;extra::rapidjson;heap;heap_library;extra::rapidjson
debug: INNOBASE, MYSQLD_STATIC_PLUGIN_LIBS: archive;extra::rapidjson;ext::zlib;blackhole;extra::rapidjson;ext::zlib;csv;extra::rapidjson;example;ext::zlib;federated;extra::rapidjson;heap;heap_library;extra::rapidjson;innobase;sql_dd;sql_gis;ext::zlib;ext::lz4;extra::rapidjson
debug: MYISAM, MYSQLD_STATIC_PLUGIN_LIBS: archive;extra::rapidjson;ext::zlib;blackhole;extra::rapidjson;ext::zlib;csv;extra::rapidjson;example;ext::zlib;federated;extra::rapidjson;heap;heap_library;extra::rapidjson;innobase;sql_dd;sql_gis;ext::zlib;ext::lz4;extra::rapidjson;myisam;myisam_library
debug: MYISAMMRG, MYSQLD_STATIC_PLUGIN_LIBS: archive;extra::rapidjson;ext::zlib;blackhole;extra::rapidjson;ext::zlib;csv;extra::rapidjson;example;ext::zlib;federated;extra::rapidjson;heap;heap_library;extra::rapidjson;innobase;sql_dd;sql_gis;ext::zlib;ext::lz4;extra::rapidjson;myisam;myisam_library;myisammrg;extra::rapidjson
debug: NDBCLUSTER, MYSQLD_STATIC_PLUGIN_LIBS: archive;extra::rapidjson;ext::zlib;blackhole;extra::rapidjson;ext::zlib;csv;extra::rapidjson;example;ext::zlib;federated;extra::rapidjson;heap;heap_library;extra::rapidjson;innobase;sql_dd;sql_gis;ext::zlib;ext::lz4;extra::rapidjson;myisam;myisam_library;myisammrg;extra::rapidjson;ndbcluster;ndbclient_static;extra::rapidjson
debug: PERFSCHEMA, MYSQLD_STATIC_PLUGIN_LIBS: archive;extra::rapidjson;ext::zlib;blackhole;extra::rapidjson;ext::zlib;csv;extra::rapidjson;example;ext::zlib;federated;extra::rapidjson;heap;heap_library;extra::rapidjson;innobase;sql_dd;sql_gis;ext::zlib;ext::lz4;extra::rapidjson;myisam;myisam_library;myisammrg;extra::rapidjson;ndbcluster;ndbclient_static;extra::rapidjson;perfschema;extra::rapidjson;ext::zlib
debug: TEMPTABLE, MYSQLD_STATIC_PLUGIN_LIBS: archive;extra::rapidjson;ext::zlib;blackhole;extra::rapidjson;ext::zlib;csv;extra::rapidjson;example;ext::zlib;federated;extra::rapidjson;heap;heap_library;extra::rapidjson;innobase;sql_dd;sql_gis;ext::zlib;ext::lz4;extra::rapidjson;myisam;myisam_library;myisammrg;extra::rapidjson;ndbcluster;ndbclient_static;extra::rapidjson;perfschema;extra::rapidjson;ext::zlib;temptable;extra::rapidjson
debug: NGRAM_PARSER, MYSQLD_STATIC_PLUGIN_LIBS: archive;extra::rapidjson;ext::zlib;blackhole;extra::rapidjson;ext::zlib;csv;extra::rapidjson;example;ext::zlib;federated;extra::rapidjson;heap;heap_library;extra::rapidjson;innobase;sql_dd;sql_gis;ext::zlib;ext::lz4;extra::rapidjson;myisam;myisam_library;myisammrg;extra::rapidjson;ndbcluster;ndbclient_static;extra::rapidjson;perfschema;extra::rapidjson;ext::zlib;temptable;extra::rapidjson;ngram_parser
debug: MYSQLX, MYSQLD_STATIC_PLUGIN_LIBS: archive;extra::rapidjson;ext::zlib;blackhole;extra::rapidjson;ext::zlib;csv;extra::rapidjson;example;ext::zlib;federated;extra::rapidjson;heap;heap_library;extra::rapidjson;innobase;sql_dd;sql_gis;ext::zlib;ext::lz4;extra::rapidjson;myisam;myisam_library;myisammrg;extra::rapidjson;ndbcluster;ndbclient_static;extra::rapidjson;perfschema;extra::rapidjson;ext::zlib;temptable;extra::rapidjson;ngram_parser;mysqlx;ext::libevent;ext::icu;mysqlxmessages_lite;libprotobuf-lite;extra::rapidjson;ext::lz4;ext::zstd;ext::zlib
これは実装を見ても WITH_${plugin} = 1 を設定しているので実装からしても合っている。
  IF(ARG_MANDATORY)
    SET(WITH_${plugin} 1)
    SET(WITHOUT_${plugin} 0)
  ENDIF()
https://github.com/mysql/mysql-server/blob/mysql-8.0.33/cmake/plugin.cmake#L131C1-L134C10
おわりに
というわけで 3 パターンのビルド方法で unittest をサポートすることが出来ると分かったが、直前の記事でややミスってしまったので自信がない。
